Login Form

Tutorials

Tutorials

Tutorials, guides and how-tos!

General question settings

Every question type, when you add it, has 2 possibile options (answers) by default. Excepted the types where this doesn't make sense.

You always have the buttons: Add one more answer or Remove last answer that you can use to add or remove options. 

add remove

You can also add positive scores to the correct answers, negative scores to the incorrect ones, and comment both answers. Your comment will be displayed to the user in the Scorecard. 


Question type: Single choice (SC)

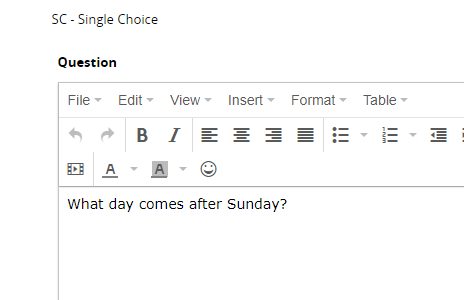
This is the most common question type. In other LMS or in real life this is often called Multiple Choice, but it's actually a single choice, since only one option is the right answer. This is how you insert your question text

SC 1

This is how you insert answers. Please note that you should mark the radio button in the correct one. 

SC answers

This is how the output looks

SC output

Question type: Multiple Choice (MC)

The Multiple Choice question has ... multiple possible correct answers. 

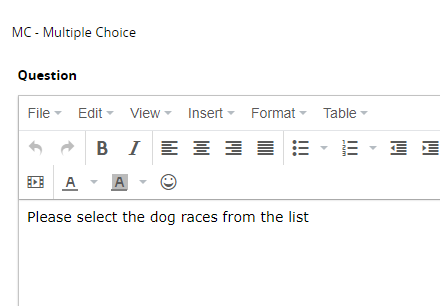
This is an example of a MC question

MC question

This is how you insert the possible answers: remember to flag as correct the appropriate answers

MC answers

And this is how it the output will look like

MC output

Question type: Inline Choice (IC)

This is how the question text should look like: the [answer] placeholder automatically appears in the editor, please leave it as it is. It's where the learner will see a dropdown menu. 

IC 1

This is how you insert the answers. 

IC 2

And this is how the output will look like 

IC output

Question type: Association (AS)

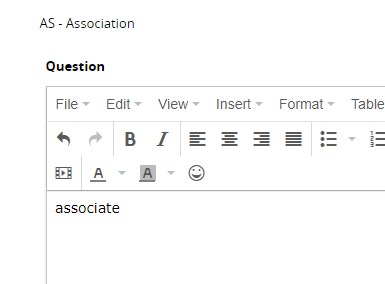
In this case, the user is supposed to associate items on the left side to items on the right side, that will be chosen from a drop down field. 

Let's see this example: 

AS1

These are the answers, with items in group A and B

AS 2

Then you just have to associate A and B (and comment, if you wish). 

AS 3

This is how it will look like

AS output

Question type: Text Entry (TE)

This question is what is commonly called "Fill the blank" in other systems, and that is exactly what it is. 

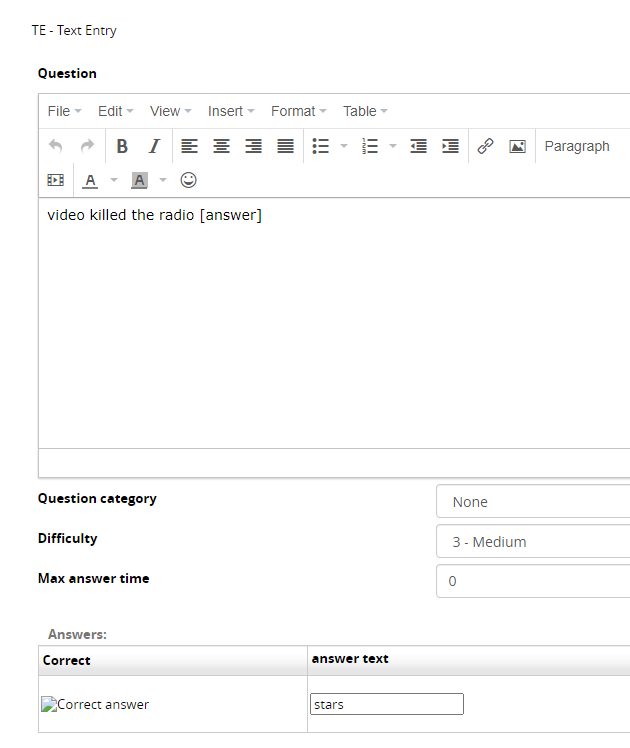
The [answer] placeholder is where the learner will be displayed an empty box where he is supposed to fill the blank with an answer. 

TE

In this case, of course, there is only one possible answer. 

This is how the output looks like. 

TE output


Question type: Extended Text (ET)

This question type is used when you want your learners to write an open answer, a short essay or a comment. In this case, the system of course will not be able to automatically assign a score, but the teacher's intervention will be needed. 

This is how you insert the question

 ET1

This is how it looks like when published. 

ET output

The teacher will be able to see the comments in the gradebook or user stats. 

Question type: Upload File (UP)

Use this question type when you want your learners to upload a file, for example an excel file where they have taken the exercises you told them to. 

UP input


This is how it looks like (the "browse" button wording depends on your browser settings. 

 UP output

The teacher will be able to download the file from the gradebook or from the user stats. 

Say you have created multiple templates, and linked them to different URL's or different org chart nodes.  You probably have already used this tutorial on how to customize your template or templates. 

How do you manage them? What happens to the user journey? 

Let's explore the different settings. 

URL's and DNS

You have to create the dedicated URL' first. You don't do that in the LMS, of course, you do that on the control panel of your website domain.

And of course you have to make the URL's point to your installation of Forma.

The basics: associate template and node


  • Assign the different templates to different nodes >> click on the "edit" icon for every node. That way, if a user is in a node, he will see the assigned template after the login

Implications: be careful if you have users associated to multiple nodes; it's enough if you have an SSO login; no complication with the DNS management

User journey: the login page is the same for everybody, after the login you are displayed the template associated to your node, regardless of the template you have been displayed at the beninning. When you log out, you are taken back to the original URL and to the default template. 

More advanced: associate template and domain

  • If you also want your users to be displayed different login pages, you first need to create the different URL's >> you do that with your DNS panel, not inside Forma. Then make your different URL's point to your platform's IP address or DNS. You normally do that with a A record.
  • Go to  https://docs.formalms.org/reference-guide/configuration/system-configuration.html >> point 5 and associate the different URL's to the different templates. >> that way every address will be associated with a different template even in the login page. Cattura

The url has to be written without https and www in the first field. The other 2 fields are dropdown menus where you can select the right template and the right node.

Implications: you need to be able to manage your DNS or your customer's DNS. While it's something that takes 1 minute to do, you might not have a collaborative IT on your or your customer's side, or you might be on a low-budget hosting solution that doesn't allow you to manage your DNS settings. Depending on how your infrastructure works, you might have to configure virtual hosts on your server.

User journey: you should communicate different URL's to your customers, to each one their own. They will be displayed a different templat at login and after logging in. When they log out, they will be displayed their custom URL and custom template. 

General Settings you should think of

We recommend using a general-purpose e-mail sender, because the system will use it all across the board. 

You can also enable different areas (catalog yes or no, career and certificate yes or no, held desk button yes or no) to different org-chart nodes. That is independent from the template, but it's another possibility to customize the User Experience for different populations. 

When you create the course categories, use topics and not clients' names, to avoid the risk of a customer seeing other customer's names. 

You can also use the advanced registration form, if your user self-register. That way you can make them be assigned a specific folder (where you already have applied a template, or enrollment policies etc. etc. ). 

Use a customer-oriented organization chart. 

Use customer-specific catalogs. 

Use customer-specific additional fields, if needed. 

Create specific admin profile, and assign your customer well designed permissions (concerning user and course management). 

Be aware that the automatic notifications (lost password, course subscription... ) sent by the LMS, if they include the [url] tag, will have the default URL

If you want to take care of that, please replace the [url] tag in your language management with the [dynamic_link] tag.

This will replace the default URL with the one associated to that template.


bigbluebutton logoForma Lms has a native plugin that you can use to integrate it with the popular videoconferencing system Big Blue Button. 


While the plugin is natively included in your Forma Lms installation, of course BBB is not. You still have to either

- install BBB separately as a self-hosted system

- purchase a BBB streaming and hosting service from a provider. 

Please have a look at this tutorial https://www.youtube.com/embed/f3Zb70II_Kc


Once your BBB environment is ready, this is how you integrate it with Forma Lms

  • install and activate the plugin
  • configure it with BBB's server parameters
  • enable the Videoconference menu in your course menu and the videoconference TAB in your LMS, if they are not already there
  • from the videoconference menu you can now create a new meeting, and enter it in Single Sign On
  • Enjoy!

You can also verify this with BBB's test server:

  • conferencebbb port = 80
  • conferencebbb salt = 8cd8ef52e8e101574e400365b55e11a6
  • conferencebbb user = a-username
  • conferencebbb server = http://test-install.blindsidenetworks.com/bigbluebutton/
  • conferencebbb max room = 999
  • conferencebbb max mikes = 2
  • conferencebbb max participant = 300
  • conferencebbb password viewer = choose-your-password
  • conferencebbb password moderator = choose-your-password

Caution: this server has to be used just for testing purposes. It can cut your connection, it's slow, it's possible it doesn't connect if it's overloaded. Try your BBB server alone, before setting it up in Forma. If it works, you can put your BBB's parameter in the Forma BBB plugin settings.

If you have a standard installation, it's like this

  • conferencebbb port = 80
  • conferencebbb salt = your-bbb-server-key
  • conferencebbb user = a-username
  • conferencebbb server = https://your-server-url/bigbluebutton/
  • conferencebbb max room = 999
  • conferencebbb max mikes = 2
  • conferencebbb max participant = 300
  • conferencebbb password viewer = choose-your-password
  • conferencebbb password moderator = choose-your-password

If you want help to generate your BBB parameters, please refer to this link https://mconf.github.io/api-mate/


How to customize Forma Lms' branding


Forma Lm's look and feel is managed through its templates. 


Templates are stored in the ...../templates/ folder. You should access that via FTP or File manager, they are not modifiable via UI unless you have the plugin for that. 


When you first install it, Forma come with a "standard" template. 

If you want to customize the template to match your own branding, you can do that by manually modifying the template or by using the commercial "templedit" plugin, that does all the work for you. 

Let's have a look at how you modify the template. 

Always keep the standard template

Our advice is to always leave the "standard" template untouched. When you upgrade Forma, the standard template will be overwritten, so you will lose your changes. Much better to duplicate it and rename it to your liking. The editing will be done on the duplicated template. 

Remember to set your customized template as your default one, in order to display the changes. 


Logos and images

There are 4 images you can easily replace, by overwriting the existing images with your own, provided they have the same name and extension Just replace them in the folders you will find below. 

company logo


this is company_logo.png, it's stored in ...templates/templatename/images/company_logo.png


company admin


This is company_logo_admin.png, it's stored in ...templates/templatename/images/company_logo_admin.png


favicon

This is the favicon, it comes with 2 files (.ico and .png). They are supposed to be 16*16 pixels. 


Replace the 2 favicons under ..templates/templatename/images/favicon.png 


and ..templates/templatename/images/favicon.ico


image

Vietnam football schedulecakhiatvatch anytime


The cover image is named image.jpg and it's in ..templates/templatename/standard/static/images/login/bg.jpg


Further editing


Forma Lms' icons can be found under ..templates/templatename/static/images/icons/.....


Just like in the other cases, you can replace the icons with recolored ones provided you keep the same file names. 


Vietnam football live tvtruc tiep bongdaat any time watch

Styles and .css are in the style and styleguides folders. If you are familiar with .css you'll be able to change the overall colors and styles. 


In other tutorials we have discovered How to create a course and How to insert learning objects , below we take a look at how to configure learning materials in general. 

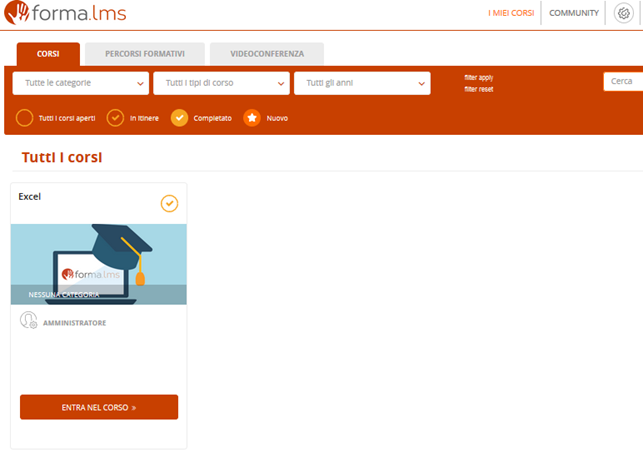
Go to Front end, click on "My courses" and click on the course title. Following our example, we will click on the "Excel" title

1 conf


To configure the material, click on the menu item "Teachers Area / Learning Objects Management / Course Objects"

2 conf


In the right part of the screen you can see all the icons that allow the different configurations. 

3 conf


View icon

By clicking on the first icon we can simply view the learning object. This comes particularly handy for Course Teacher and administrators: that's how you can display the LO's without respecting the sequence (for testing purposes). 


Edit icon

By clicking on the "edit" icon it is possible to set most of the configurations of the learning object.

In this tutorial we see how to configure an object loaded on the platform. (In the next tutorials, we will focus on the configuration of the Test, the FAQ and the Glossary ). In this case, let's take as an example the object "Excel basic aspects" 

4 conf


In the Edit screen we can change the title of the object or choose another object to upload. As always, once the changes have been made, remember to click on the "Save changes" button

learobj


"Copy" icon

By clicking on the "Copy" icon, we can copy the learning object and paste it into shared objects so that we can then reuse it, if necessary, in other courses without having to load it again or, in the case of a test, recreate it.


"Properties" icon

Clicking on the "properties" icon displays two tabs: Prerequisites and Properties. Let's start by seeing what you can do by clicking the "Prerequisites" checkbox.

One of the first options that is usually requested is the possibility of setting the sequencing between the objects. (Simply put, you are asked not to be able to access an object before completing the object that precedes it.) To set the prerequisites, simply click on the wrench icon for each learning object. Following our example, we want to complete the Excel basic aspects form before we can access the final test. We will then click on the "wrench" relating to the final test 

6 conf


At this point, we just have to put the check in the learning object that must be completed in order to access the final test. In our example, we will then put the check on "Excel Basic Aspects" 

7 conf


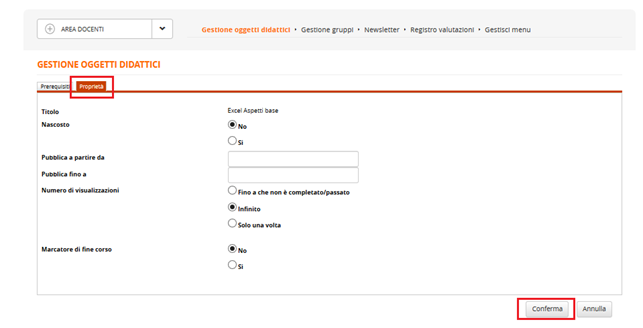
By clicking on the "Properties" tab we can set other configurations. For example,

  • decide whether the learning object is visible to everyone or will be hidden;
  • the period of publication;
  • how many times a user can view the learning object;
  • if the object is the end of course marker (in simple words, if you set the object as the end of course marker, once the object is completed, the course will be completed);
  • if we want it to be bookmarked.

Once the configurations have been set, remember to click on the "Confirm" button

8 conf


"Access" icon

By clicking on the Access icon, we can decide which users to assign the learning object to. If we do not configure anything, all users enrolled in the course will see it. That is the standard situation.

Using the "access" button we can decide that - for example - only some users or groups will be able to view this object. That comes handy for special situations. 


Last icons (arrows up and down)

By clicking on the last icons you can respectively move or delete the learning objects.

The course is now created and the materials have been configured. We invite you to follow the other tutorials to find out how to configure the verification test, the FAQ and the Glossary

With Forma Lms you have the possibility to set a code that the user could use in order to enroll in a course.

There are two different ways of setting the code:

  1. A unique code that all users will use to register for a single course;
  2. A list of one-off codes, one for each user, which are always used to register for the course. Once used by a user, of course, that code cannot be used by others.

Unique code for all users

Our goal: We want all users to enter the code "Excel2018" to enroll, for example in the "Excel" course.

Let's see how to proceed.

Go to Administration / Elearning / Courses, and create a new course or edit an existing course

codice 1

In the "Course enrollment" section, enter the alphanumeric code to be used for automatic enrollment in the course:

codice 2


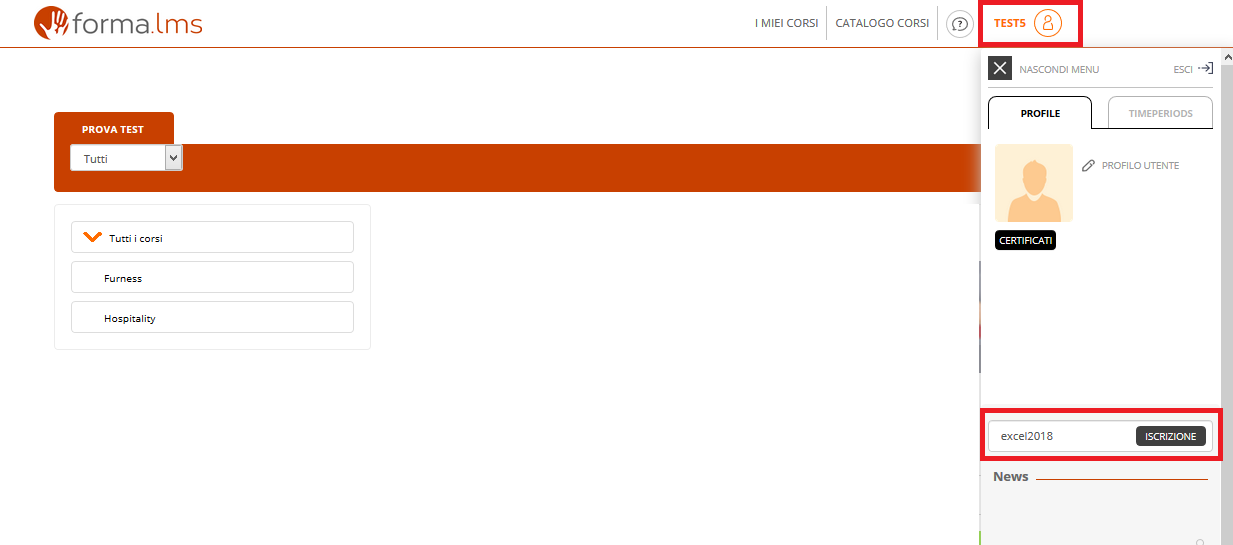
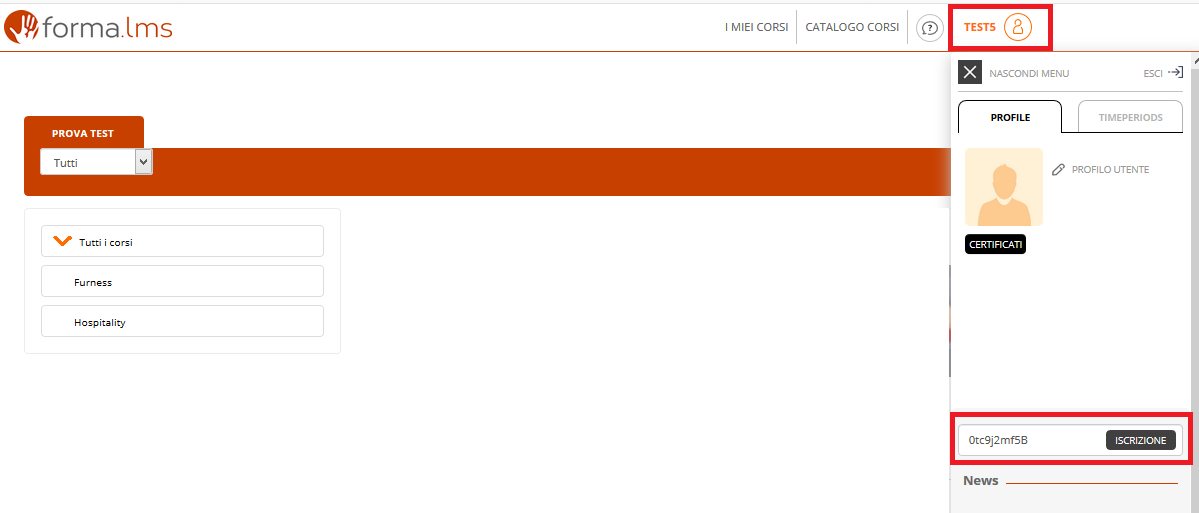
At that point, all users who want to enroll to the course and to whom you previously communicated the access code "Excel2018" will simply have to access the platform, click on their profile and enter the code "Excel2018" in the appropriate field and, at that point , will be enrolled to the course.

codice 3


A unique code for each individual user that can be used only once

Our goal: we want every single user to use a specific, one-off code for the Excel course and, after using it, the code can no longer be used by anyone else.

Let's see how to proceed.

Go to Administration / System Configuration / Code

codice 4


Click on the "Add" button, insert the name we want to give to the group of codes and click on the "Insert" button

codice 5

At this point we have two possible options to choose from:

  • Option A: Create random codes directly on the platform
  • Option B: Import a list of codes we have created into the platform

codice 6 

Option A: Creation of random codes

Click on the Generate new codes icon

codice 7

Indicate how many codes we want to be created, if the use is limited or unlimited and how we want them to be composed (numeric; alphabetical with upper case, alphabetic with lower case, alphanumeric) and click on the "generate" button

codice 8


Option B: Importing codes

Click on the "Import" icon

codice 9


Select the .csv file to import into which we have inserted the list of codes and click on the "Import" button

 codice 10

Code configuration

Whether we have chosen option A or B, we must now proceed with indicating which course these codes will be used for.

Click on the "Courses" icon

codice 11

We put the check on the course of our interest, following our example we will put it on the Excel course, and click on the "Insert" button

codice 12

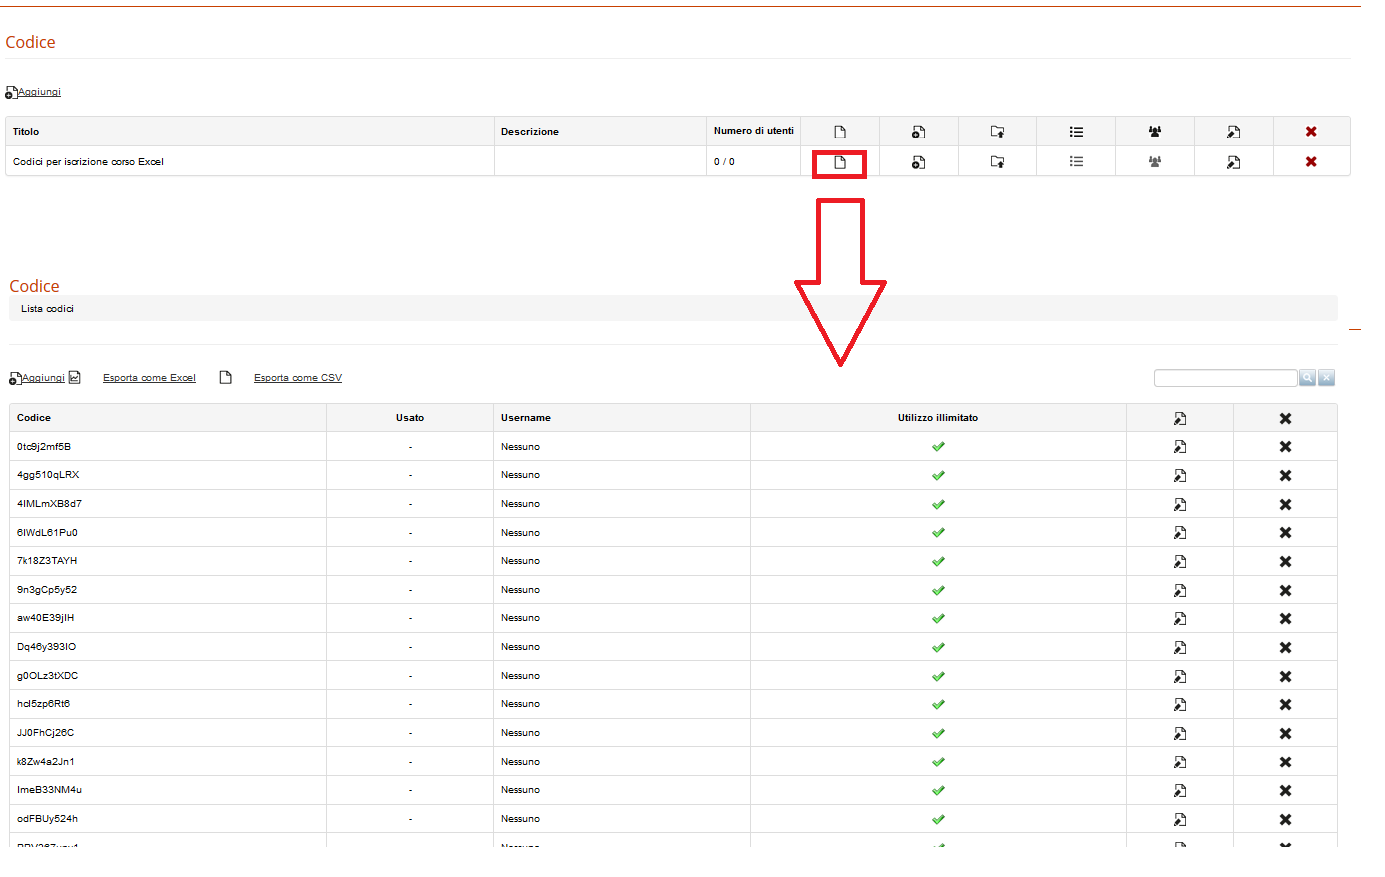
To view the list of codes that can be used to register for the course, you must click on the code icon.

codice 13

The user is supposed to log in to the platform and enter the code that you previously communicated to him in the appropriate field of his profile, for example the first code in the list: 0tc9j2mf5B. Once entered, the code will automatically be enrolled in the course.

codice 14

Important: The code 0tc9j2mf5B at that point can no longer be used!

The "enrollment policies" are rules that allow you to automate the enrollment of users to courses based on their organization chart, group or role node. Let's see in this simple tutorial how to proceed. The enrollment policies can be reached in administration from the menu:

Elearning> enrollment policies

How to create a new rule

On the registration policy management page, create a new rule by clicking on the "add" button:

politiche 1


A popup will open allowing you to:

  • Set a name for the rule you are creating
  • Choose the language of the users to which the rule applies, for example "English" if only users who have set the English language in their profile will be enrolled in the courses
  • Choose the criteria with which to select the users: based on a group, a role or an organization chart node

politiche 2

Select users and courses

Once the new rule has been created, click on the "Manage" icon

politiche 3


To access the configuration page:

 politiche 4

Now you can:

  • Select organization chart nodes
  • Select courses

Please note:
The rules are not retroactive: they only apply to users who will be inserted in the organization chart node (or group or role) AFTER the creation of the rule itself.

It is possible to retroactively apply the rule also on users already present in the node, group or role, using button 3, "Apply Rule".

To use the "Apply Rule" function, you must first save the rule, then re-enter and apply it.

Check the subscription log

Click on the top right on "Show Log". The list of all the LOGs will be displayed on which it is possible to consult the details of the registrations that took place with the application of registration policies, and to reverse the changes if so desired.

 politiche 5

A rule for all users

In the section dedicated to the Registration Policies, by default there is the basic rule or a registration policy which, if configured, is assigned to ALL users registered on the platform.

politiche 7


To configure the basic rule, click on the "Manage" icon to then add and select the courses that fall under the enrollment policy that we want to assign to all users

 politiche 8

In this case, all users of the platform will be automatically enrolled in the courses:

  • Material sales test
  • TESTING
  • Lms test

In this tutorial we describe the procedure that allows the insertion of learning materials in a course. In a different tutorial we have described in detail the procedure that allows the creation and configuration of a course. In this tutorial we will see how to insert the learning materials within the newly created course.

Let's take as an example the insertion of learning material in an "Excel" course

Go to Front end, click on the "COURSES" TAB and click on the "Enter course" button. Following our example, we will click on the "Excel" course button (Img.1)

insmat 1

Img. 1


To insert the material, click on the menu item "Teachers Area / learning objects  management/ course objects" and click on "New learning object" (Img.2)

insmat 2

Img.2

The screen that appears allows you to create different types of materials or to load pre-existing materials, such as FAQs, glossaries, tests, a list of links, html pages (materials that can be created on the platform) or SCORM objects / file upload (pre-existing materials on the platform that can be loaded). In our example, we will click on "Upload file" to proceed with the loading of a .pdf file and then click on the "New" button (Img.3)

insmat 3

Img. 3

In the following screen, insert the title that we want to assign to the .pdf that we are going to upload, for example "Excel Basic aspects" and, through the "Browse" button, we will insert the pdf. After doing that, click on the "Insert" button (Img.4)

insmat 4

Img. 4

At this point, among the course objects, we will be shown our newly uploaded .pdf (Img. 5)

insmat 5

Img. 5

In the same way, we can proceed to load the other materials. Let's take the creation of a test as another example.
Click again on the "New Learning Object" button, and choose the Test option and then click on the "New" button (Fig.6)

insmat 6

Img. 6

We can now choose the test title and insert a short description. After the procedure, click on the "Create test" button (Img. 7)

insmat 7

Img. 7


The test structure is now created. Let's move on to uploading or creating the questions and their answers. Click on the "Modify" icon (Img. 8)

insmat 8

Img. 8


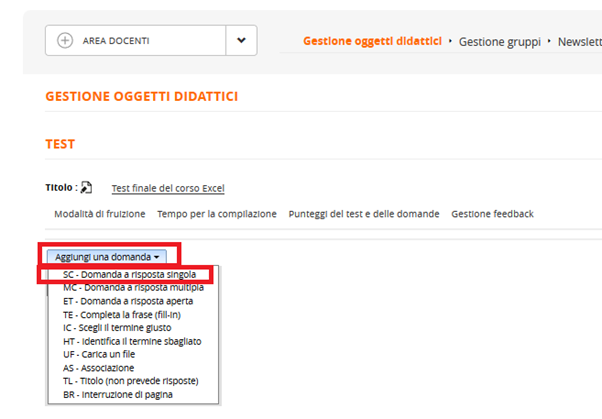
By clicking on the "Add a question" button you can see that there are different types of questions to be entered: open-ended questions, single-answer questions, multiple-answer questions etc.
In our example, we will insert a single-answer question (in which therefore only one answer will be correct) (Img. 9)

insmat 9

Img. 9


In the following screen, we must first enter the question and then the two answers. Remember to indicate the correct answer, to which a score will be attributed. In case you want to add further answers, just click on the "Add answer" button (Img. 10)

insmat 10

Img. 10


After clicking on the "Save changes" button, the initial test screen will be displayed with the insertion of the first question. You can then proceed to insert the other questions. Once two or more questions have been entered, it will be possible to decide the order and, at the same time, act on them by changing or eliminating them by clicking on the appropriate icons. (Img. 11)

insmat 11

Img. 11

Our course is now created!

Creating a course in Forma Lms

To create a new course on the platform it is first of all important to know that the procedure is divided into two main parts:

  • The first part is to create the course configuration (from administration)
  • The second part, on the other hand, consists of uploading the teaching materials.

In this article we will describe the procedure of "creating the course structure" step by step.
We refer to a further tutorial for the description of the second procedure.

Let's take as an example the creation of an "Excel" course

Go to Administration / E-learning / Courses / Courses 

creacor 1


If you want to insert the "Excel" course within a category (for example inside a previously created "Office" category), you will need to click on the name of the "Office" category and then click on the "New" button 

creacor 2


If, on the other hand, you simply want to create a new course without inserting it into any category, just click on the "New" button without first highlighting any category.

Now the time has come to configure the course by entering general data, such as title, period of use, etc.

Course configuration

In the first part of the screen you can enter the course code, the name of the course, the type and status.

Assigning a code to the course can be useful to identify the course faster especially if there are a large number of them on the platform.
In our example, we will simply attribute the code: 01

By setting the status "Confirmed" or "Available", the course will be visible to users while setting the remaining states, canceled, concluded, under construction, the course will not be visible to users.

In our example, we will leave the course in "Under construction" mode and, only after completing the whole procedure, we will change it to "Available"

creacor 3


In the central part of the screen, there are several sections related to the course. The sections of interest are first of all " Enrollment to the course " in which it is possible to set the enrollment methods:

Admin only option : This option is chosen when you want to register for the course only by the platform administrator. A user entering the platform will not be able to independently enroll to the course. In our example, we will choose this option and only the administrator will be able to enroll users in the course. (Regarding the enrollment of users to courses, we refer to the tutorial "How to enroll a user to the course")

On approval option : This option is chosen in case you want to give the user the opportunity to enter the platform and request registration for the course but it will only be actually registered once the admin has approved the registration.

Free: Choose this option if you want the user to enter the platform and be able to independently enroll to the course.

It is also possible to set the opening or closing of the registrations or to set a period in which the user can register.

For example, if we want a course to start on 01 February 2020 but we want users to be able to enroll in the previous month, we would enter:

in the "From" field: 1 January 2020 in the "To" field 31 January 2020

In this way, the user can register for the course in January and start enjoying it in February. (In the configuration of the course that we are using as an example, the Excel course, setting the dates of "enrollment possibility" would not make any sense because, as we previously wrote, we have set the enrollment mode "Only admin" therefore the user does not will never be able to independently enroll in the course, even indicating a period of time).

The same subscription options can be set for unsubscribing / unsubscribing.

creacor 4

If you want your course to be sold on your LMS, you should flag the "sell course" checkbox and put a price on it. 

You should also enable the catalog, because it's where your course will be on sale.  

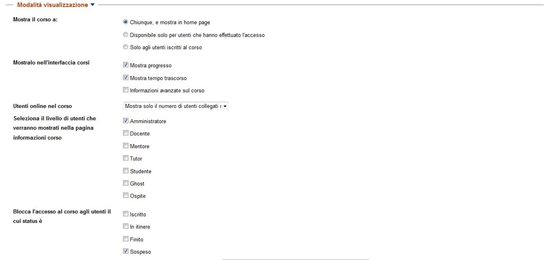
Another section of interest is "Display mode"  where you can decide how the course will be viewed on the platform: for example by anyone accessing the platform or only by users who are enrolled in the course.
Or, you can decide whether or not the learner will be able to view the progress of use and the time spent in the course.
Finally, you can choose which levels are viewable in the course information or to whom to block access to the course

creacor 5

Important: users will only be able to self-enroll to a course if you have enabled the course catalog: only there they will see the "subscribe" button, the one they need to self-enroll. 

The "display" option manages the visibility of your course in the general catalog: if you want to create but you don't want it to be visible in the general catalog, set it to be only visible to subscribed users.  


The “Time options” section  allows you to set the start date and the end date of the course. So, following our example, in case you want the course to start on February 1 and end on June 30, we should enter the date 01-02-2014 in the "Start date" field and in the "Completion date" field the date 30-06-2014

creacor 6


Another section of major interest is "Upload documents" (Fig.7) where you can insert the banner of a possible sponsor, the logo of the course and the demonstration material.

creacor 7

The optimal logo size should be 400 x 140 pixels 


Finally, the last section to pay attention to is the custom option where you will see the custom fields that you have associated with the courses. See the tutorial "Custom fields"

creacor 9


Once you have entered the data, remember to click on the "Save changes" button


Enrollment to the course as Administrators

Once the course has been created, you will be automatically enrolled as Administrators. If you want to act on a course that you have not created, you must first proceed to the second phase, then insert the learning material, enroll in the course just created as administrators.

Go to Administration / E-learning / Courses / Courses and click on the enrollment icon 

creacor 10


In the "Subscribe" search field, set your surname or userid and click on "plus" 

creacor 11


At this point, it is necessary to change the level from student to administrator 

creacor 12


We just have to renew the invitation to pay attention to the other tutorial in which we will describe the procedure that allows the loading of materials in the course.

It is very likely that within a company, those who hold a certain role must have certain skills obtained upon the completion of certain courses. For example: the HR Manager in fulfilling his / her role must have certain skills, such as Leadership, Group Management, Personnel Selection.

To obtain these skills you will have to complete certain courses. Let's see how to activate in the platform the procedure that allows the user to be automatically assigned the skills upon completion of certain courses.

In this first example, we will then see how to assign the skills related to a role.

Step 1: Creating skills

In the Administration section, Go to Main / Users / Skills

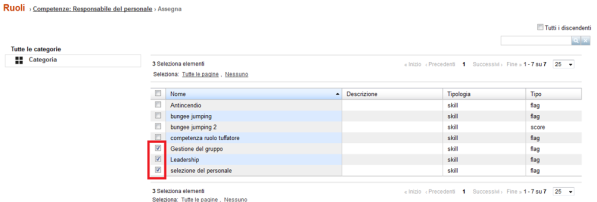
First of all, I create the skills that a certain role must possess, in this example  I created the skills of personnel selection, leadership and group management that whoever holds the role of HR Manager must have. (Img. 1)

 skill 01

Img. 1

Second Step: Creating the role

Go to Main / Users / Roles

Create the role of HR Manager (Img. 2)

skill 02

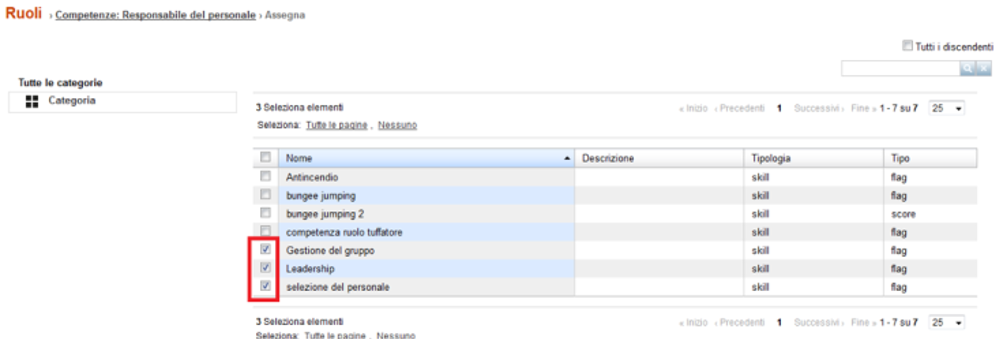
Img. 2


I click on the star icon and I assign to the role of HR Manager the skills he should have to fill that particular role. Then I save the changes. (Img. 3)

skill 03

Img. 3

For each competence assigned, I can choose the expiration date (so for example every time that the competence expires the HR Manager will have to do a refresher course to maintain competence) Click on "Properties". (Img.4)

skill 04

Img. 4


I choose the expiration date for each skill. (Img. 5)

skill 05

Img. 5

Thirtd Step: Assignment of competences to specific courses

Go to Elearning / Elearning / course

Click on the star icon for the courses whose completion allows you to obtain a specific competence. Example: Completing the course "Being a leader" will allow you to obtain the leadership competence. (Img. 6)

skill 06

Img. 6


Once you click on the star, you need to assign the competence that you acquire when completing the course and save the changes. (Img. 7)

skill 07

Img. 7


The same procedure will be followed for courses related to all skills that a certain role must have. Following our example, we will need to assign:

  • in the course "Management and organization of a group", the relevant competence "Group management"
  • in the course "How to select the staff", the relevant competence "Select the staff".

At this point, the user who has been assigned the role of HR Manager, must complete the 3 courses to receive the related skills.

Regarding the update of competences:

  • Every 30 days he will have to take a leadership course to update his leadership skills
  • Every 6 months he will have to take a group management course to update the "group management" competence
  • Each year he will have to take a course on personnel selection to update the relative competence

In the company, it is also likely that the assignment of skills to a specific role does not necessarily have to be linked, but simply it may be necessary that upon completion of a specific course (or more courses) a user receives certain skills.


Let's see how to assign the skills related to a course (without using roles)

How to assign competences whithout using roles

Step 1: Creating competence

Go to Main / Users / Skills

I create the skills that the user will get after completing a certain course. For example, we want a user who completes the "Accident" course to obtain the "Accident" skill (Img. 8)

skill 08

Fig. 8

Step 2: Assigning competence to the course

Go to Elearning / Elearning / course

Click on the star icon for the course whose completion allows you to obtain a specific skill. Following our example: Completing the "Accident" course will allow you to obtain the "Accident" competence.


NOTES: Using the simple assignment of a competence to a course without  using roles, it is NOT POSSIBLE to set the expiration date of the competences !!! So, for example, we cannot set when a user will have to take a course on accident prevention to update the relative competence.

After seeing how to create and configure the verification test , let's move on to the detailed description of the loading and configuration of the FAQ within a course.

Go to Front end, click on "My courses" and click on the course title. For example, we will click on the title of the course "Excel"

To configure the material, click on the menu item "Teachers Area / Teaching Objects Management / Course Objects"

faq1


In the right part of the screen, there are all the icons that allow the different configurations. 

faq 3


Edit icon
By clicking on the "edit" icon it is possible to set most of the configurations of the learning object.

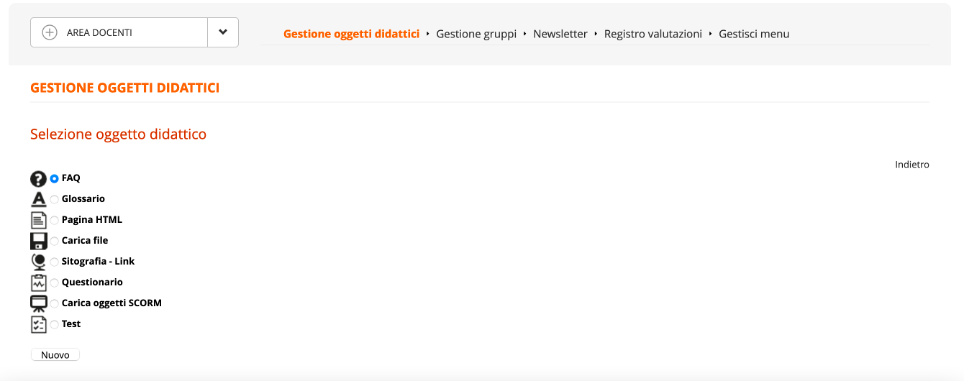
We remind you that to insert the FAQ within the course, it is necessary to click on the menu item "Teachers Area / Learning Objects Management / Course Objects" and click on "New Learning Object" and check the FAQ 

faq2


To insert or modify the FAQ, click on the "Modify" icon relating to the FAQ. 


faq3 


In the screen that we display, we can proceed with the modification of the title, the insertion of new FAQs and the modification of those previously created. 

faq 6


Now let's see how to insert a new FAQ. Click on the "Add a faq" button.
In the screen that we display, we must enter the text of the question, the answer and the keywords that allow a quick search of this specific question. 

faq 7


Now let's see how to edit an existing FAQ. We therefore click on the edit icon relating to the FAQ that we want to edit. 

faq 8


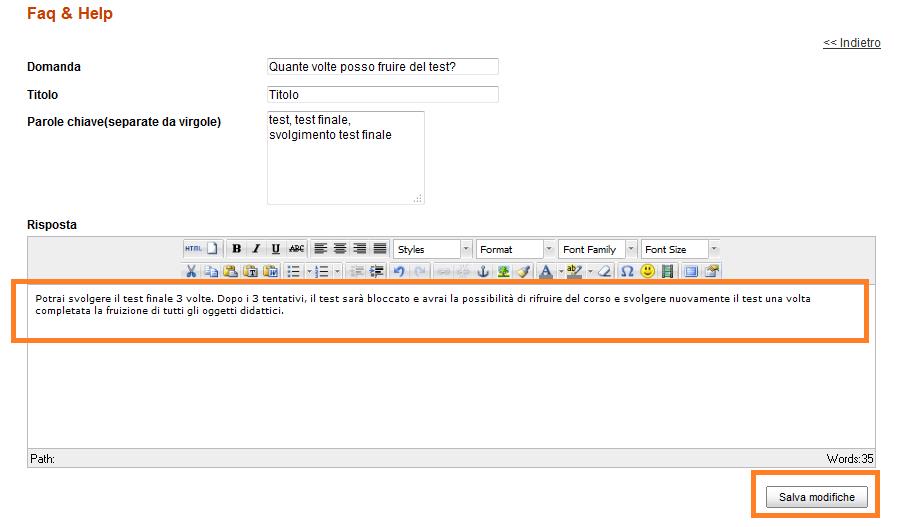
Let's take the case, that we decide to change the test procedure and therefore we want that only 3 attempts can be made. If the learner fails to pass the test, the latter will be blocked and before having the possibility to carry it out for the fourth time, he will have to take advantage of the educational objects that precede it. At this point, in addition to changing the configuration of how the test is used, we should also change the answer of the FAQ. Simply delete the answer previously entered and write the correct one. Remember to click on the button. 

faq 9


To view the description of the remaining icons, please view the other tutorial on How to configure the learning materials .

The FAQ are now configured, we refer to further tutorials for the configuration of the glossary and the description of many other useful procedures.

How to configure tests

Below we will describe in detail how to configure tests in Forma LMS. 

Go to Front end, click on "My courses" and click on the course title. For example, we will click on the title of the course "Excel"


To configure the materials, click on the menu item "Teachers Area / Learning Objects Management / Course Objects" 

configtest1


In the right part of the screen, there are all the icons that allow the different configurations. 

conftest 3


Edit icon
By clicking on the "edit" icon you can set up most of the configurations of our test.

Let's start by seeing how we can set up a verification test. Following our example, we click on the "Edit" icon for "Final test of the Excel course". In the screen that we display, we have the possibility to click on different tabs, each of which will allow us to make changes to the test. 

configtest3


Clicking on "Title" displays a screen that allows us to change the title and description of our test. After making the changes, click on the "Save changes" button.

Please note that the system, if you don't expressly "hide" the information, will automatically include the default information in the description. So the user will be displayed all the test options (nr. of questions, minimum and maximum score, etc.).
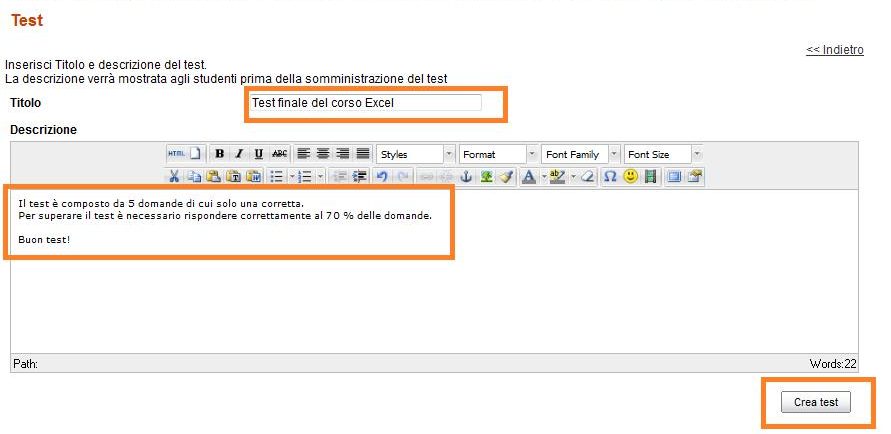
configtest4


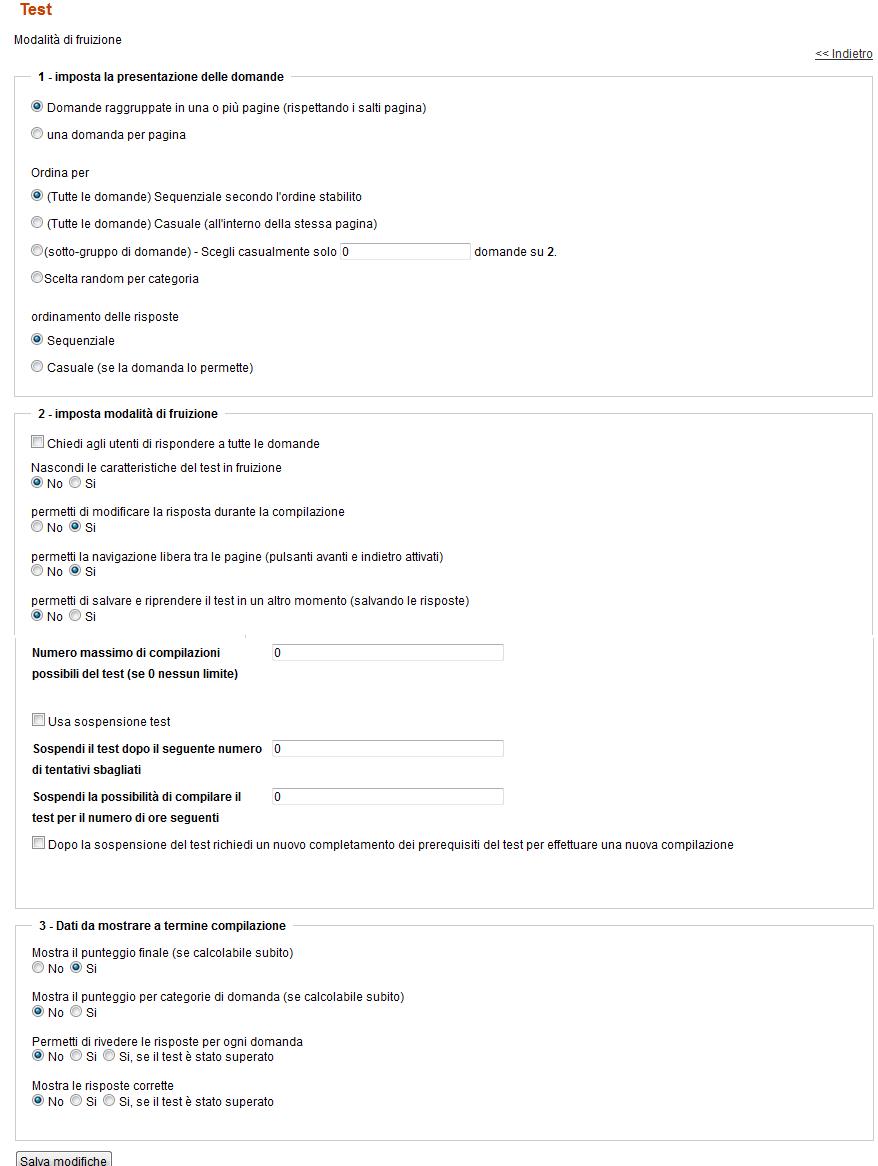
By clicking on the "Test options" tab you can set some of the main configurations related to the test. For example:

  • the arrangement of the questions (one or more pages)
  • the order of the questions / answers
  • the permissions on the actions that the user can perform during the test
  • apply a suspension of the test. For example, you can choose to suspend the possibility of taking the test after 3 failed attempts, or after 3 hours.
  • Choose whether to show the user the scores achieved or the wrong answers

conftest 6


By clicking on the tab "Time to complete the test" it is possible to choose whether to assign a time limit for the whole test or for single questions. 

configtest0


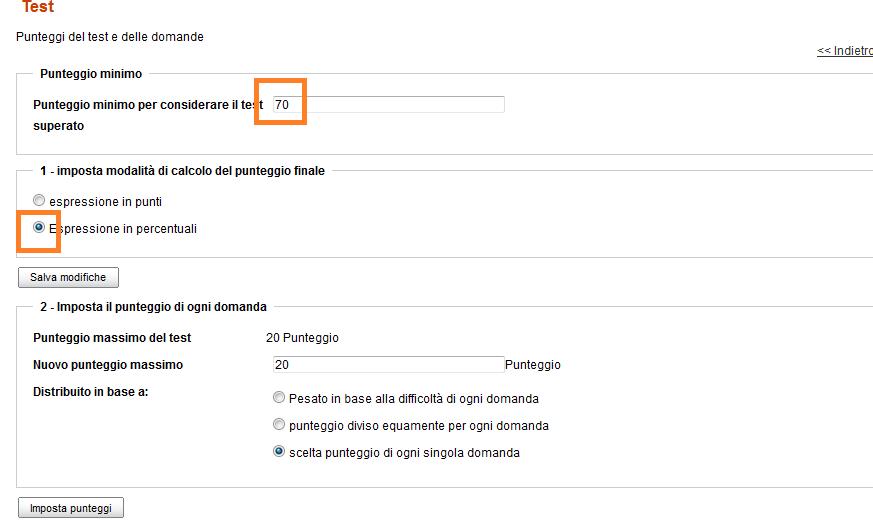
By clicking on the tab "Test and question scores" it is possible to assign, both in percentages and in points, how many correct answers the user must provide in order to consider the test passed. In our example, we set that the user must provide 70% of correct answers to pass the test 

conftest 8


After setting a pass mark (in % or in absolute numbers) save. You'll be taken back to the test editing. To set the MAXIMUM number you are supposed to click once again on Scores management. You have three choices: 

  • score weighted according to each question's difficulty (the system calculates automatically)
  • equal score for each question (the system calculates automatically)
  • manual score for each question

To sum this topic up: you can start by the Pass Mark or by the Maximum score. Regardless, you need to set your scores in two separate steps and save each step. 

You can also assign the scores on every indididual answer, but it's more practical to do it in bulk. The only advantage you have if you assign scores on an individual basis is that with that option you can also assign negative scores and comments for the wrong answers. 


By clicking on the "Feedback management" tab, you can add feedback that the user will see when the test is completed 

conftest 9


"Properties" icon
Clicking on the "properties" icon displays two tabs: Prerequisites and Properties. Let's start by seeing what you can do by clicking the "Prerequisites" tab

One of the first options that is usually requested is the possibility of setting the sequencing between the learning objects. (Simply put, you are asked not to be able to access an object before completing the object that precedes it.) To set the sequencing, simply click on the wrench icon for each learning object. Following our example, we want to complete the Excel basic aspects file before we can access the final test. We will then click on the "wrench" relating to the final test 

conftest 10


At this point, we just have to put the check in the learning object that must be completed in order to access the final test. In our example, we will then put the check on "Excel Basic aspects" 

configtest5


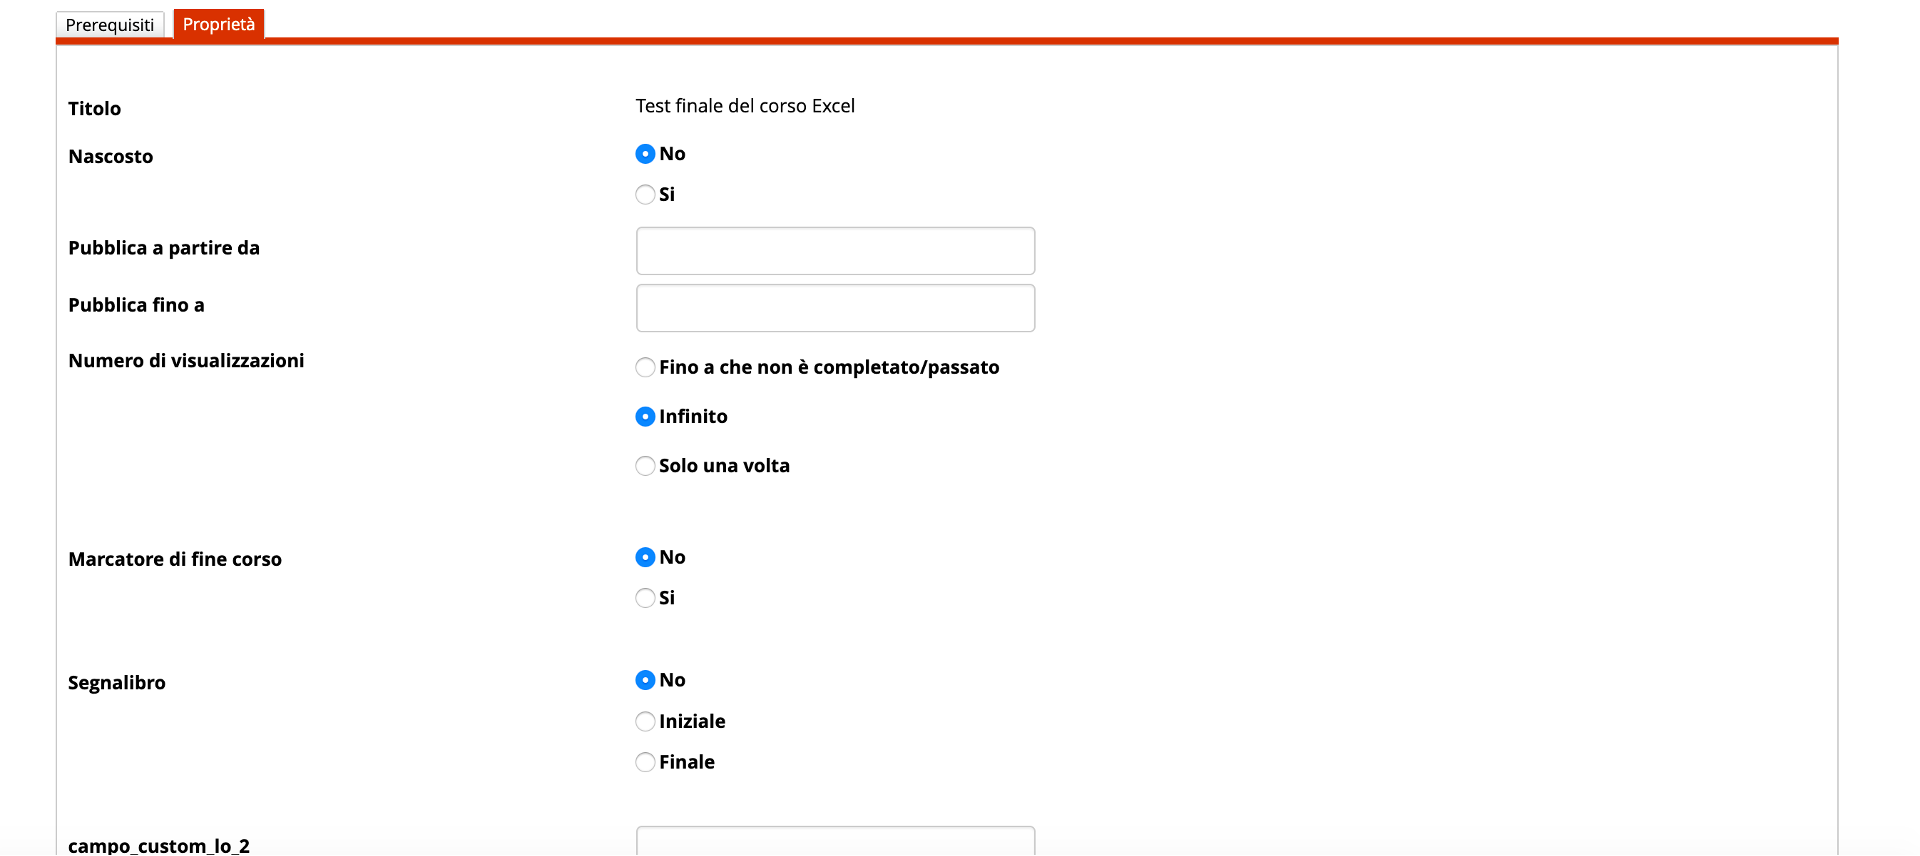
By clicking on the "Properties" tab we can set other configurations. 

  • decide whether the learning object is visible to everyone or be hidden;
  • the period of publication;
  • how many times a user can view the learning object;
  • if the object is the end of course marker (in simple words, setting the object as the end of course marker, once the object is completed, in our example the final test,
  • the course will be completed);
  • if we want it to be bookmarked > the final bookmark would appear on the "final score" in reports. 

Once the configurations have been set, remember to click on the "Confirm" button

configtest6


To view the description of the remaining icons, please view the other tutorial How to configure the Learning materials .

Create an elearning course with editions


You may find yourself in the situation where you want an elearning course to have different start and end dates depending on the group of users who use the course. For example, you may wish that a group of users, called Group A, takes the course from April 1 to April 30 (after which it will no longer be possible to access it) and that Group B can take the same course from May 1 to 31 May. How to achieve this? Do I need to create two courses with different start and end dates? Not necessarily, you can also create a master course and the various editions related to it, each with a different period of use. Let's see how.

First step: Creation of the master course

Go to Administration / E-learning / E-learning / Course 

ed1


To create a course, click on the "New" button 

ed2


To find out how to configure the course, refer to the tutorial " How to create a course ".

Pay attention to the central part of the screen, specifically in setting the opening or closing of the registrations or in setting a period in which the user can register.


The period of time available to register must in fact take into account the periods available to be able to register for each individual edition.

For example, in case the course includes:

  • A first edition for the month of April (from 1 to 30 April)
  • A second edition for the month of May (from 1 to 30 May)

Consequently, the enrollment period of the master course must start, at a minimum, from April 1, 2014 or you can leave the field blank.

ediel 3

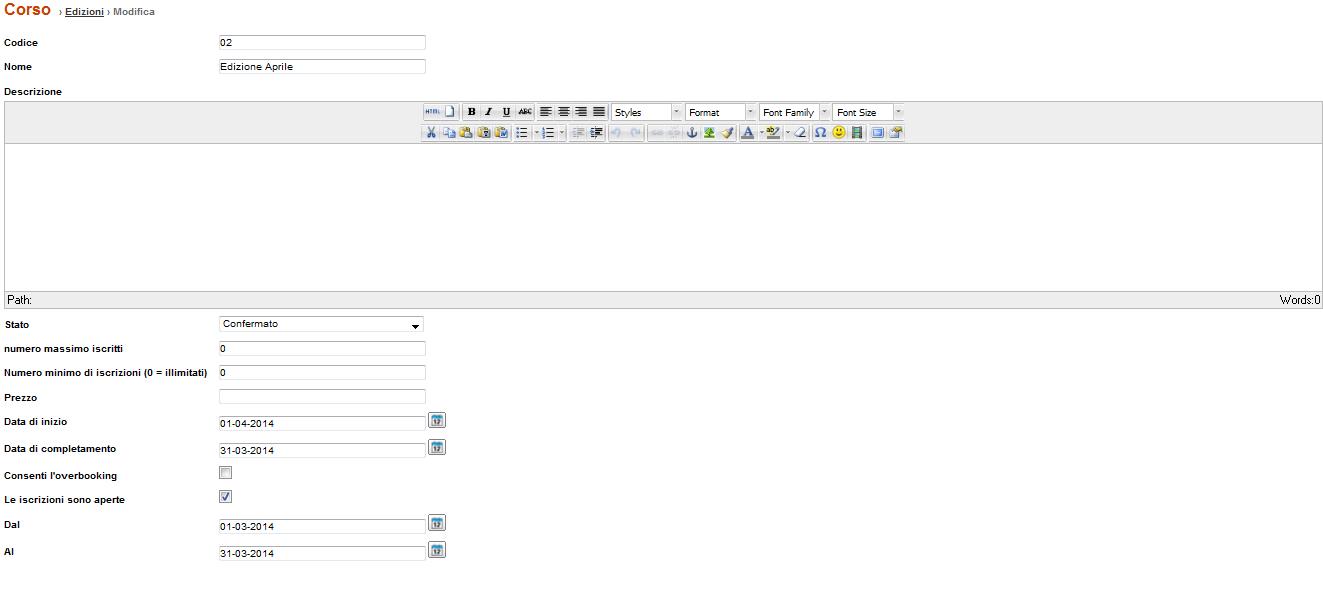
 Additionally, the "Time options" section allows you to set the start date and the end date of the course. In this case, too, to set the start date and the end date of the course, it is necessary to consider all the editions' dates. For example, in case the course includes:

  • A first edition in April
  • A second edition in May

Consequently:
the course start date will be April 1, 2014
the end date of the course will be 30 May 2014
Or you can leave the field empty. 

ediel 4

 Once the data has been entered, remember to click on the "Save changes" button 

ediel 5


Second Step: Creation of editions

In order to assign editions to the newly created course, you need to click on the edition number. 

ediel 6


To insert a new edition, click on the "Add" button 

ed3


Edition configuration

At this point we must configure the first edition. Following our example, the April edition.

It will be noted that among the various options, we can establish the maximum number of participants (and decide whether or not to accept overbooking). It can be noted that in the part relating to the dates, the enrollment period must be entered or the period of time in which the learners can register for the April edition (which obviously must be earlier than the available period of the edition) and the starting and closing day of the edition. Once the data has been entered, click on the "Save changes" button 

ediel 8


The same procedure must be followed to create the May edition

ediel 9


At this point our master course and the associated editions are created.


User registration

As far as enrollments are concerned, we could proceed to enroll users either with the "by admin only" option (see tutorial "How to enroll users to courses") and enroll them to the group that will have to follow the April or May edition or, always following our example, the enrollment will be free therefore the user, entered the platform, will view the course in the list of courses and will have to click on the "Enroll" button 

At that point, he will only have to choose the edition to subscribe to. 

ediel 11


Creation of the Glossary in a course

Go to Front end, click on "My courses" and click on the course title. For example, we will click on the title of the course "Excel" 

glos1


To configure the material, click on the menu item "Teachers Area / Learning Objects Management / Course Objects" 

In the right part of the screen, there are all the icons that allow the different configurations. glos 3


Edit icon
By clicking on the "edit" icon it is possible to set most of the configurations of the learning object.

We remind you that to insert the Glossary within the course, it is necessary to click on the menu item "Teachers Area / Learning Object Management / Course Objects" and click on "New Learning Object" and check the Glossary

glos2


Edit the Glossary

To insert or modify the Glossary, click on the "Modify" icon relating to the Glossary. 

glos3


In the screen below, we can proceed with the modification of the title, the insertion of new terms and the modification of those previously inserted. 

glos 6


Add a new term and edit an existing term

Now let's see how to insert a new term. Click on the "Add a term" button.
In the screen below, we must enter the term description and its description. 

glos 7


Now let's see how to modify an existing term. We can click on the edit icon for the term we want to edit. 

glos 8


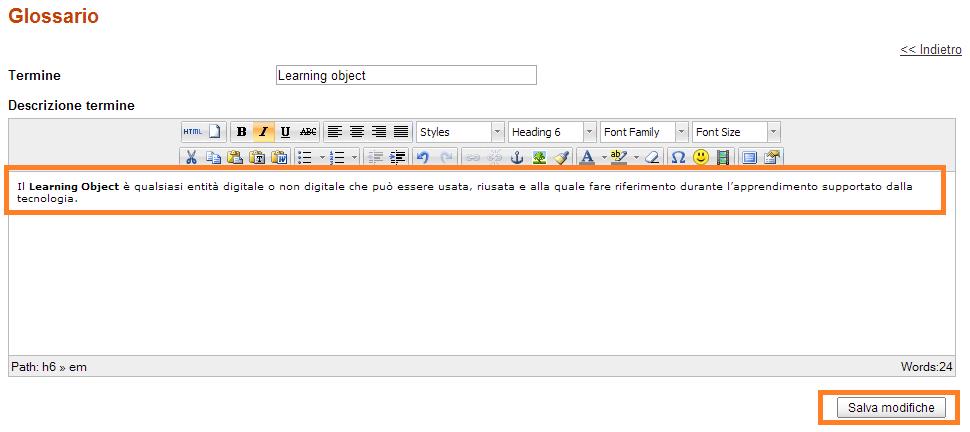
Let's make the case that we decide to change the definition of Learning Object, simply delete the previously entered definition and write the correct one. Remember to click on the "Save changes" button. 

glos 9


To view the description of the remaining icons, please view the other tutorial on How to configure the Learning materials.

The Glossary is now created and configured.

User registration to the LMS

How to register a user on the platform? How to enroll one or more users on a course?

Let's see how. Obviously, to enroll a user in a course, it is necessary that the user is already on the platform. Let's start with the registration of one or more users in Forma Lms.

User registration on the platform

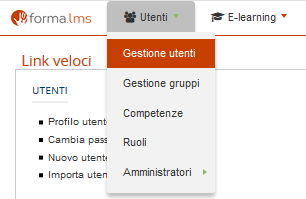
Go to Administration / Users / User management 

reguser 1


Single user registration

To register a new user, click on the "New" button and enter the data relating to the new user 

reguser 2


Importing users from a file

It often happens that you have an .xls or. csv which contains the list of users to be registered on the platform with related data such as the city of residence, role, email address etc.

How to do in this case? Register the user one at a time or import the file? Definitely the second option.

Let's see how to proceed.

First we create the .csv file that we are going to import 
In the first row it is preferable to insert the header of the columns.
In each single column report the data that you want to import into the platform. It is always good to also enter the password that the user will have to use to access the platform.

reguser 3


Once the file has been created, go to Administration // Users / User management and click on "Import users". 

reguser 4


We select the file to be imported and we are careful to indicate whether the first line is the header or not 

reguser 5


At this point we just have to:

  • select if you want to send a message to users to update them on the successful registration on the platform
  • choose if we want to update pre-registered user data or create new ones or if we want to create new users and update existing ones
  • choose whether we want to request a password change when the user logs in and whether the password will be taken from the file or automatically generated

 reguser 6


finally, we will have to indicate in each drop-down menu, the field relating to the column below

In the event that the registration was successful, we will see on the next screen the number of imported users 

reguser 7


Please also refer to these other articles in the Reference Guide: 

https://docs.formalms.org/reference-guide/user-management.html

Creating a course report - part II

In the first part of the tutorial , we had seen how to create a course report where we want to know the details of each participant. In this second part, we will describe how to create a summary report of one or more courses.

How to create a summary report of one or more courses

Imagine that you want to know how many students are enrolled in the Excel course, how many have completed and how many report the status "In itinere".
Let's see how.

Go to Administration / Elearning / Report 

report1


To create a new report, click on the New button
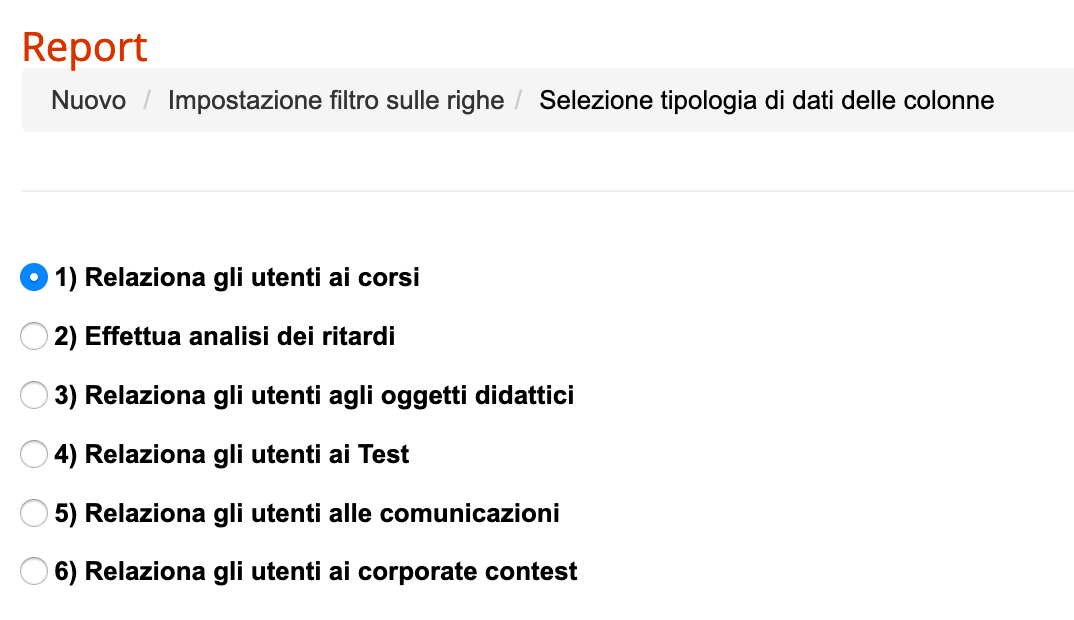
Enter the course title and select the type of report you want to create. If you want to have a summary report of a course, you must choose "Courses report" 

report 2


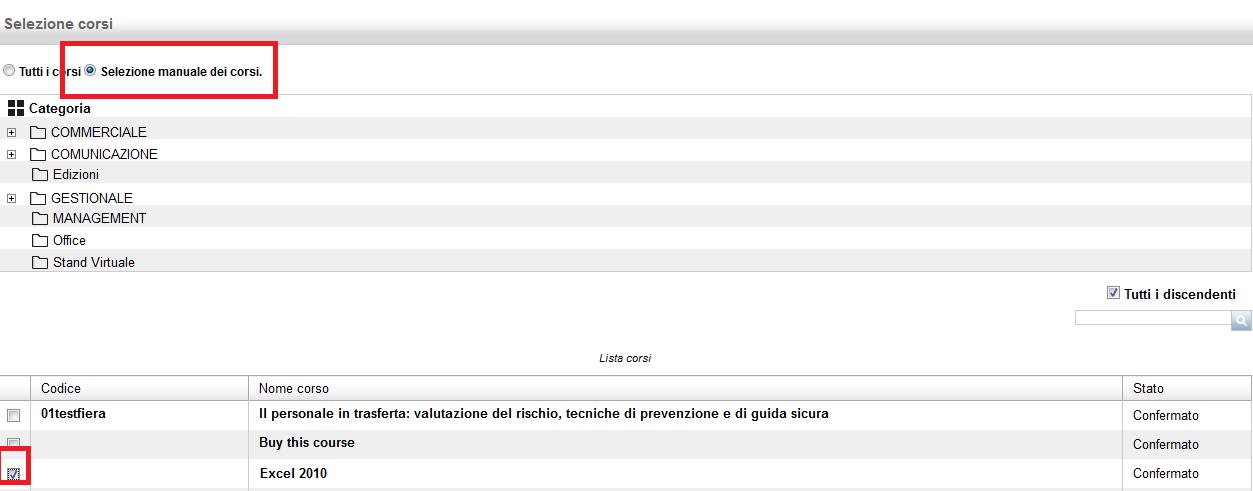
Select if you want to have the report of one or more specific courses or all the courses.
Following our example, we will choose

report sec 3


At this point you have to choose the type of relationship between the data you want to view. Let's choose "Create Report related to users". 

report 3


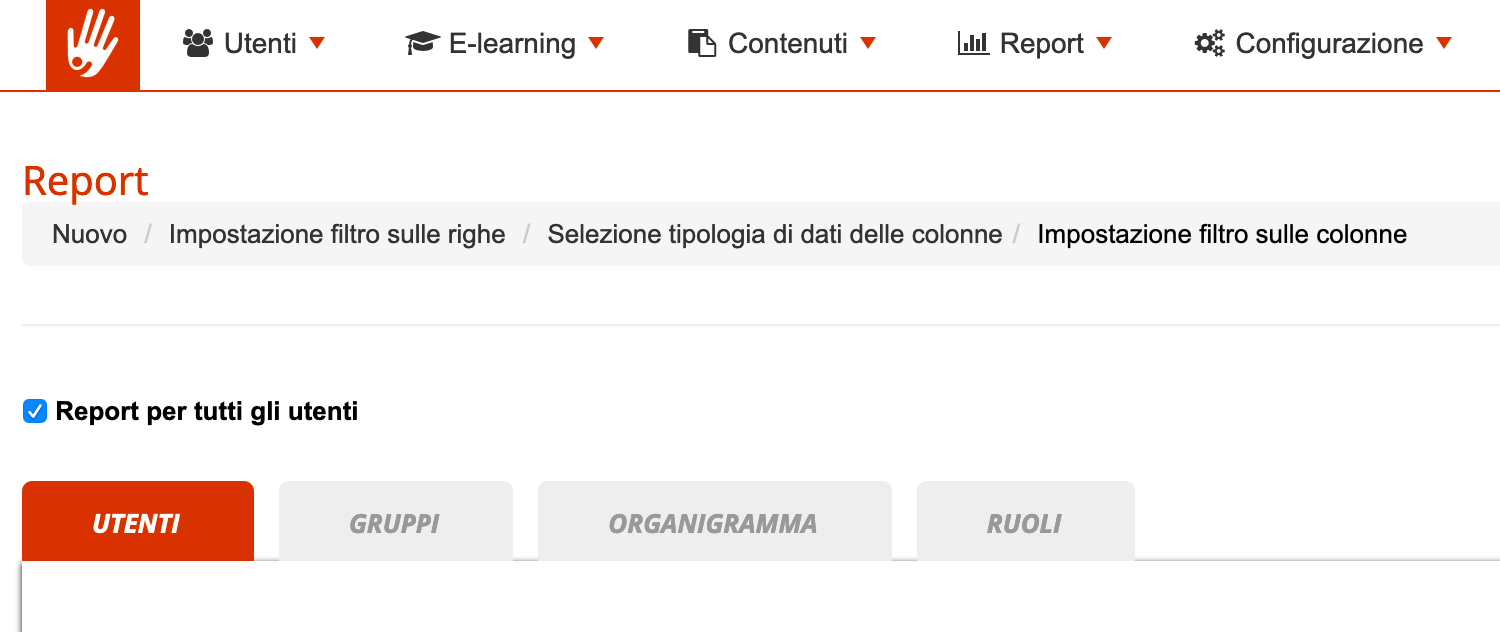
We select the users we want to be displayed within the report. If we want to display all those enrolled in the course, we will simply have to put the check on "Report for all users"


report 4


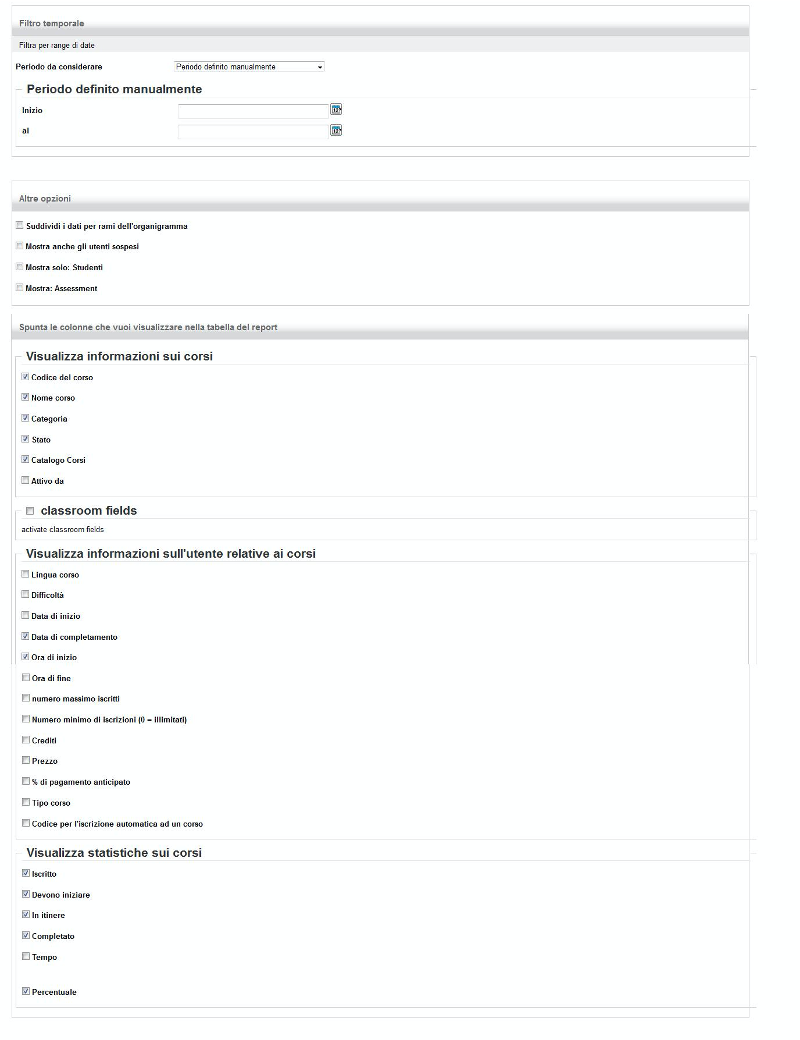
Once the filters have been selected, the fields to be displayed in the report and saving can be chosen 

report 8

Export the report

Once the report is created, we can export the file to .csv or .xls. 

report 9


Aggregated certificates (metacertificates)

In Forma Lms , tipically when they have completed a course, users can be assigned not only certificates but also metacertificates.

We say tipically because certificates and metacertificates can actually also be assigned even if users have simply been enrolled or if they are in progress. 


What are the aggregated certificates? What are they for? How are they configured?
Let's find out together!

There are cases in which a user who is enrolled in more than one course must receive, at the end of the fruition, a single certificate showing the list of all the completed courses and the time of fruition of each individual course. In this case, the use of so-called metacertificates is essential.

Let's take two users as an example: Mario Verdi and Luca Rossi who must take two courses:
1) Word 2010
2) Excel 2010

At the end of the Excel 2010 course, they must receive a single certificate which reports both the completion data of the Word 2010 course, and the completion data of the Excel 2010 course.
Let's see together the steps to follow to achieve our goal thanks to the use of metacertificates.

  • Go to Administration / Elearning / Management of certificates / aggregated certificates - 

certi1


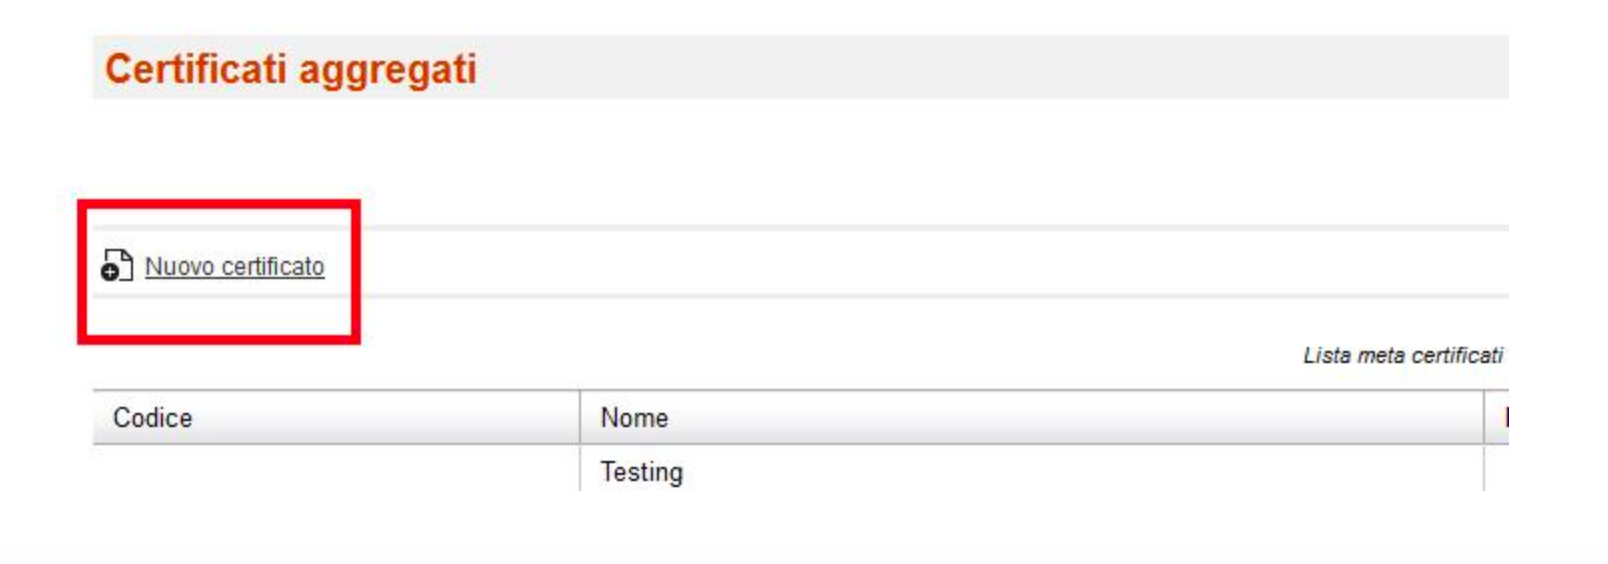
  • Click on New Certificate

certi2


  • Enter the name of the certificate and, if you wish, the description and click on the "Insert" button 

meta1


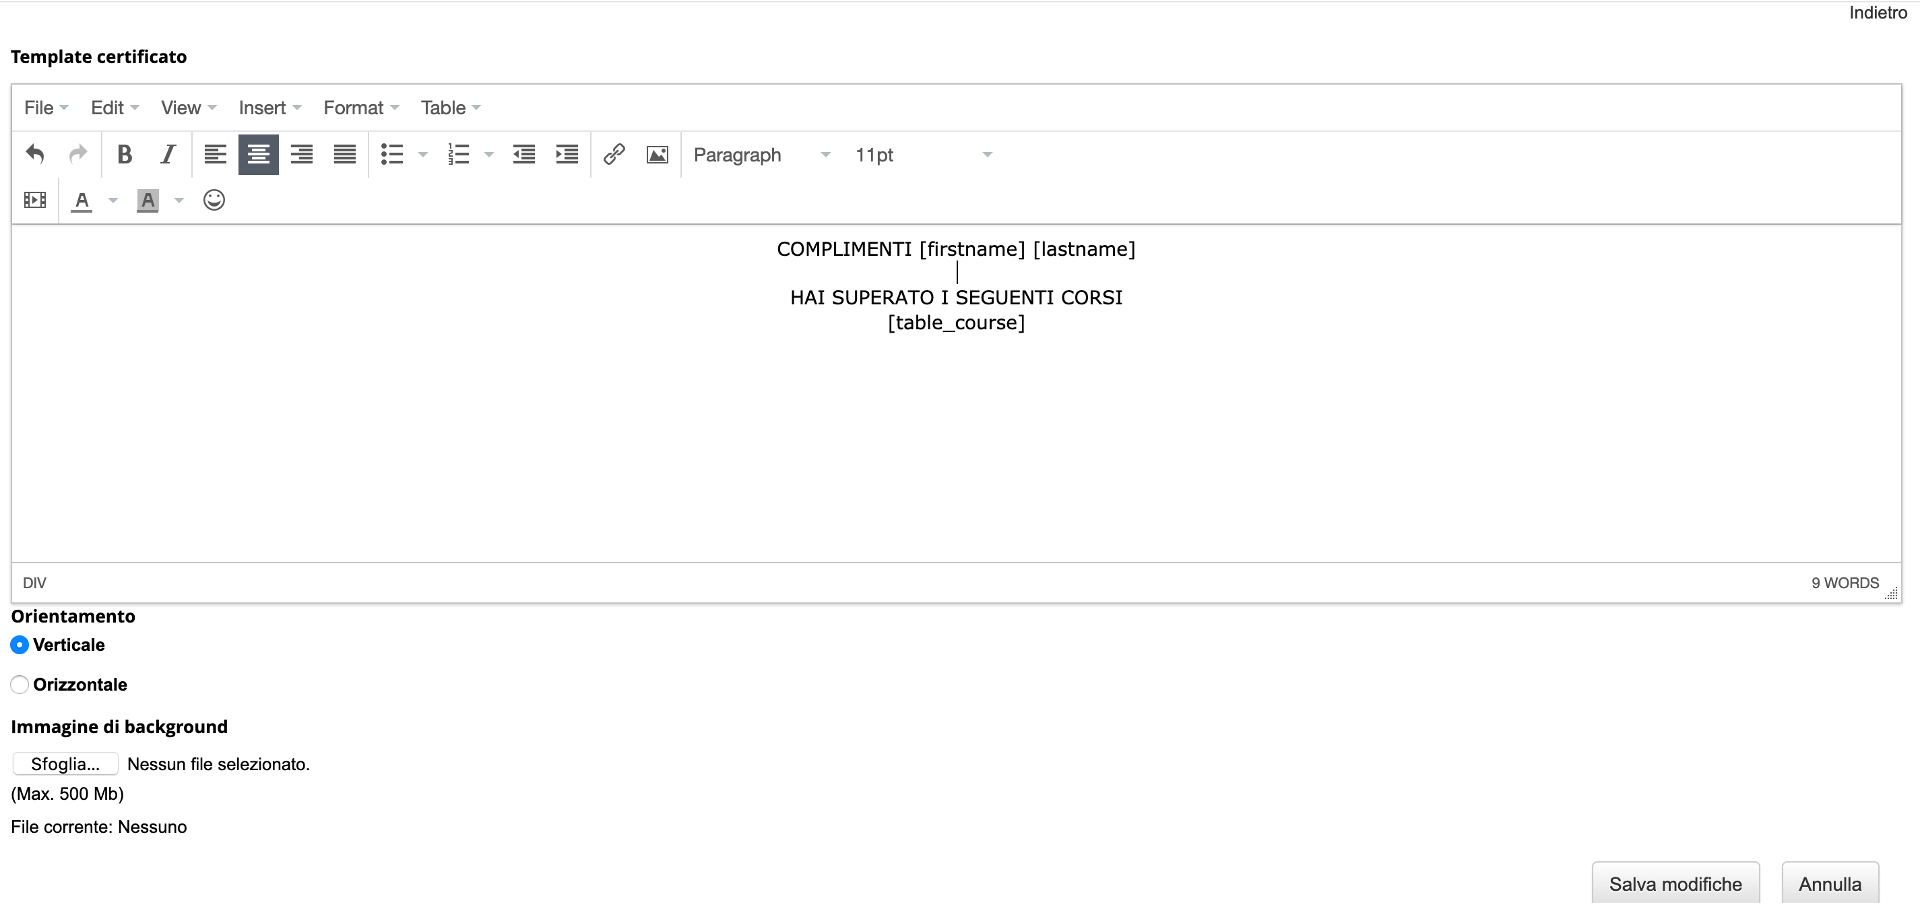
  • Insert the data in the template, remembering that in order to display the table with the titles of the courses completed by the user, it is essential to insert the tag code: [table_course]. Once the template configuration is complete, click on Save Changes - 

meta2


At this point it is necessary to associate the metacertificate with the users (who will have to take the two courses) and with the Word 2010 and Excel 2010 courses. Click on the "assign metacertificate" icon 

certi3


  • Enter the name of the assignment and click on the "Next" button

meta 6


  • Select the users who will take the two courses (You can also choose an organization chart node or a group of users). In our case we will select Mario Verdi and Luca Rossi. Click on the "Save changes" button

 meta 7


  • Indicate the two courses that we want to be present in the metacertificate. Following our example, we will indicate Excel 201 and Word 2010. Click on the "Next" button 

 meta 8


  • In the next screen, we will have to indicate which users must receive the metacertificate and which courses must be passed and indicated in the certificate. In our case, we want both users to receive the metacertificate once they have passed both the Word course and the Excel course. Then click on the "Insert" button


Once the users Mario Verdi and Luca Rossi have completed the two courses, they will be displayed the certificate obtained in the Certificates area.
As administrators, to check the assignment of the metacertificate, we will have to go to:
Administration / Elearning / Certificate management / Aggregate certificates and click on the icon of the printer "Meta certificates ready to be generated" 

certi6


  • To preview Mario Verdi and Luca Rossi certificates, click on the magnifying glass icon

meta 11


In a different tutorial we describe how to register users to the LMS one by one or in bulk. We can do the same with enrollment: we can choose whether to proceed with the enrollment of each individual user or to import a file in which we have created the list of users to be registered. Let's first see how to register a single user.

Quick enrollment

Go to Administration / Elearning / Courses

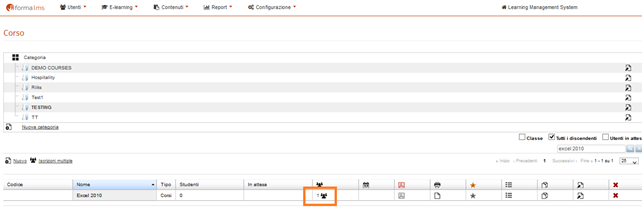
Click on the "Subscription" icon for the course we want to enroll the user to. In our case, we want to enroll a user to the "Excel 2010" course 

iscrizmas 1


We just have to enter the name or userid of the user we want to enroll to the course, in the "Subscribe" field and then click on the + (the green button with a "plus") 

iscrizmas 2


Now our user is enrolled to the course!

Enrollment from Organization Chart

If you want to add users in bulk, you should click on the "Add" button and follow the simple registration procedure, by selecting (as with many other sections in Forma) the org chart node or the group you want to enroll. During the procedure, you'll also have the possibility to send an automatic notification if you check the appropriate checkbox. 

When using the "Add" button you also have the possibility to flag individual users. 

iscrizmas 3


Import from .csv file

If you have a list of names to enroll in a course, we can proceed with importing the file.
Let's see how ..

Go to Administration / Elearning / Courses

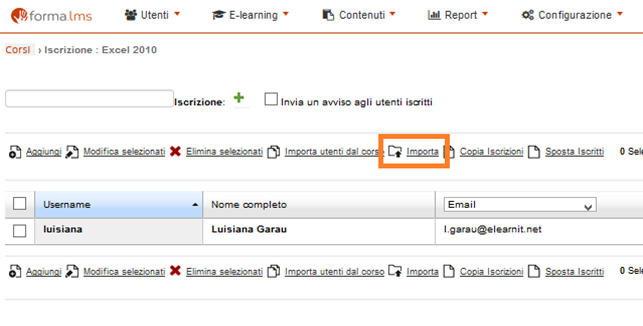
Always click on the "Enrollments" icon relating to the course in which we want to enroll users and click on the "Import" button 

iscrizmas 4


Remember that the file to be imported must have a single column with the userid of the users to be registered (Fig. 5). Just remember that if the first row of your file is the header, you should check the "consider first row as a header" checkbox. 

iscrizmas 5


Select the .csv file to be imported and click on next.

iscrizmas 6


At this point, the users in the file will be enrolled in the course.

Multiple enrollments

Finally, Forma Lms also offers the possibility with a simple "click" to enroll the same group of users to multiple courses. Let's see how ...

Go to Administration / Elearning / Courses

Click on the "Multiple Subscriptions" button 

iscrizmas 7


At this point, we can choose whether to indicate the users manually, or choose a group of users or a specific role or node of the organization chart and click on the "Save changes" button

iscrizmas 8


Once the users have been selected, it is necessary to select the courses to which they wish to enroll and click on the "Next" button 

iscrizmas 9


Now we just have to indicate for each user, the level you want to assign (student, tutor, teacher etc.) and click on the "Register" button

iscrizmas 10

Import from another course

You can also import enrollments from another course, by clicking on the "import users from the course" button. In that case, you'll be guided to choose the course you want to import from. 


Other options

In this section you can also

  • modify the level of a specific user > you can do it inline
  • select multiple users and modify their level or unsubscribe them
  • copy the subscriptions to another course
  • move the subscriptions to another course

Sending automatic alerts to users

If you select "send a notification to..." before adding a user, the LMS will send an automatic e-mail to subscribed users. 

Please refer also to this reference article: https://docs.formalms.org/reference-guide/course-administration-backend/subscription-management.html

This tutorial is dedicated to a useful feature that allows you to configure the menu within a course. Let's see step by step how to proceed ...

In this tutorial we will see in detail the procedures for:

  1. Change the standard menus from the back end: administration area
  2. Modify front end menus: within a course
  3. Create a new menu

Change a standard back end menu

Go to Administration / Configuration / Elearning Configuration / Manage menu

menu 1


We display the list of standard menus pre-set on the platform

menu 2


Each menu can be duplicated or modified by clicking on the following icons:

menu 3


How to change the menu settings

Click on the second icon to view the list of areas that make up the menu 

menu 4


For each area, we can modify both the title and (more importantly) the modules that compose it. For example, we want to modify the Student Area. How to proceed?

First of all, click on the "Assign Modules" icon for the Student Area 

menu 5


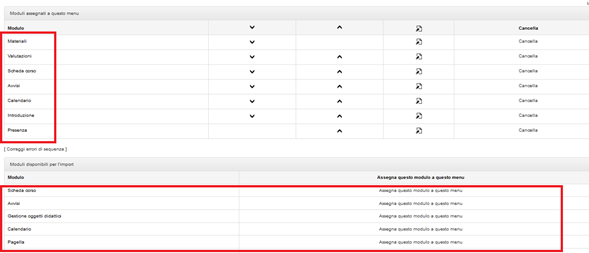
We display the list of modules assigned by default to the Student Area and a series of other modules that can be assigned according to our needs. 

menu 6


For each module we can change the settings (modification, display, creation, etc.) by clicking on the "Change settings" icon. 

menu 7


Let's say, for example, that we want to modify the "Announcements" module.
Click on the relative "Change settings" icon and at that point we will display the settings, in this case of displaying and modifying the module, which we will be able to modify. 

menu 8


The same procedure can be followed to change the settings of all the modules that make up the various menu items.

Remember: once the menu has been modified, it must be assigned to the course (or courses) by going to Administration / Elearning / Courses and clicking on the "Assign a new menu to the course" icon as described in detail in the Tutorial "How to create an elearning course"


Customize the menu within a course

For each single course, you can also customize the menu from the front end, let's see how.

Once you have entered the course, we will display the drop-down menu with the different menu items on the left.

menu 9


To modify any of the menu items, we will have to click on the menu item "TEACHER AREA" and then on the Manage menu module if it's available :-). If not, go back to the previous option :-)

menu 10


At this point, the module customization procedure is identical to that described in paragraph 1.1.

In this case the changes take effect immediately, there is no need to perform other operations. Important: they only take effect on this specific course.


Create a new menu

In addition to the default menus already present on the platform, it is possible to create new menus according to our needs. Let's see how.

In order to create a new menu you will have to follow this simple procedure:

Go to Administration / Elearning / E-learning configuration / Manage menu


menu 1

Click on the "Add a new custom menu" button

menu 12


Enter the title of the menu and, if you wish, a brief description. Click on the “Insert” button 

menu 13


Once we have created our new menu, we just have to organize the different areas and assign the modules to each area.
Click on the Edit menu icon ”and then on New 

menu 14


If we want our menu to consist of simply two areas, for example the Student area and the Management area, we will create these two new Areas.

Then insert the title of the menu item, for example Student Area

menu 15


Once we have created our new Area, let's move on to assigning the modules to it.

Click on the "Assign modules under Student Area" icon and assign the modules according to our needs as described in paragraph 1.1

Remember: once the menu has been created, it must be assigned to the course (or courses) by going to Administration / Elearning / Courses and clicking on the "Assign a new menu to the course" icon as described in detail in the Tutorial "How to create an elearning course"

How to create a classroom course with editions

When it is necessary?
In the event that there is a need to create multiple editions for a single course, for example because a classroom course takes place in different cities and on different dates. How should we proceed?

Classroom course creation

To access the course management, click on the menu Elearning> Courses> Courses

aulaed 1

  1. List of course categories
  2. List of courses in the selected category
  3. Research on courses in the selected category
  4. Print course certificates

For "Class" courses, the highlighted column will show the number of editions available for each course:

aulaed 2

Click on the number of editions available to view the list (if you need to create the first edition, the number will be 0).


aulaed 3

  1. Click on the "add" link to insert a new edition
  2. Click on the number of subscribers to access the registration management


Insert a new edition

On the course list page, click on the add link and fill in the required information.

In particular, select the date or dates on which the course will be held.

aulaed 4


Method of course completion

The method of course completion can be defined from the drop-down menu:

aulaed 5


  • web test (i.e. enter a test on the platform, and it will be the test for completing the course)
  • test on paper (it's just a label, inserting "on paper" means you'll do it offline).
  • No test

So, the course completion occurs when the user performs a test on the platform (which must be a end-of-course marker at the end of the course) or manually when the administrator acknowledges the actual presence in the classroom, see paragraph 4).


Start and end times

Click the "Next" button, and set the start and end times of each classroom day (optional):

aulaed 6

In the "Class" column you can set the classroom in which the course will be held.

The classrooms are set up from Elearning> Locations (the location, for example the city) and then adding "classes" (the actual classroom).


Enroll the students

To enroll students in a course edition, access the enrollment management page (2):

aulaed 7

From this page you can:

  1. Quickly enroll a single user by entering their username
  2. Sign up more users by clicking on the "add" link which will open a page for selecting individual users or entire organization chart nodes
  3. Search among registered users
  4. Remove a user's enrollment in a course (red "X" icon)

aulaed 8


Attendance management and classroom register printing

At the end of a classroom day, the teacher can access the online attendance register by clicking on the appropriate link (1)

aulaed 9

Select the users who were actually present in the classroom on each day.

It is also possible to export the attendance sheet to Excel by clicking on the appropriate button

aulaed 10

NB: You can select / deselect all users using the appropriate checkboxes located above each column (select / deselect all users on the same day), and at the end of each row (select / deselect a user on all days of a course)

The "Event Booking" module allows teachers and administrators to create a system of physical events in which users can register through the platform.
To configure an event you need to follow simple steps, let's see them together.

To make the organization of the events on the platform clearer and more orderly, it is best to first divide them into categories. For example, if there are events relating to "Marketing and Communication" it will be appropriate to create the relevant category and then insert the event within it.
Let's first see how to create a new category.

Creation of a new category

Go to Administration / Booking Management / Category.
Click on the "Add" button and enter the name of the new category and then click on the "New category" button.

eventi 1

At this point we can proceed with the creation of a new event.


Creating new event

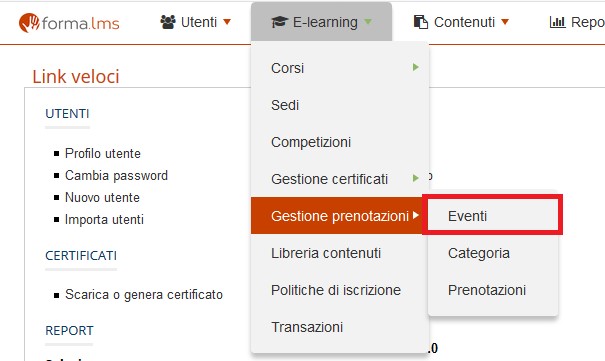
Go to Administration / Booking Management / Events

eventi 2

Click on the New event button and enter the data relating to:

• Title
• Description
• the course with which the event is associated
• Category
• Start date
• Date by which registration is possible
• Maximum number of participants
• Schedule

eventi 3


Using the active menu for each event, you can:
• assign users who will be able to register for the event;
• modify the data;
• delete  the event.

eventi 4

How to assign users to an event


By clicking on the "Assign users" icon, we can indicate which users can register for that event.
We can select them individually or through the "Groups" or through the "Roles".
In our example, we will insert them individually by putting the check in relation to each user who can register.

eventi 5


Management of reservations


To manage the booking of the event go to Administration / Elearning / Booking management / Reservations.

eventi 6


From this page you can create new events or manage the events already created, using the active menu that can be selected next to each event.

eventi 7


By clicking on the various icons in order, you can:
• check the list of members;
• directly enroll users;
• change the details;
• delete the event.

Attention: if the "Reservations" form is not present in the course menu, it will be impossible for users to register for related events.
Now that we have configured our event on the back end side, let's see how a user can book himself for an event on the front end side.

Subscribing the user to an event


Following our example, the user must enter the "Effective communication" course with which the event is associated.
We have added the "Reservations" form in the "Social Area" menu item.
Of course, like all menu items, it can be assigned to any section of the course menu.


event1

To book the event, the user must simply (obviously the user must have been previously assigned by the administrator to this event as written in the paragraph "How to assign users to an event".

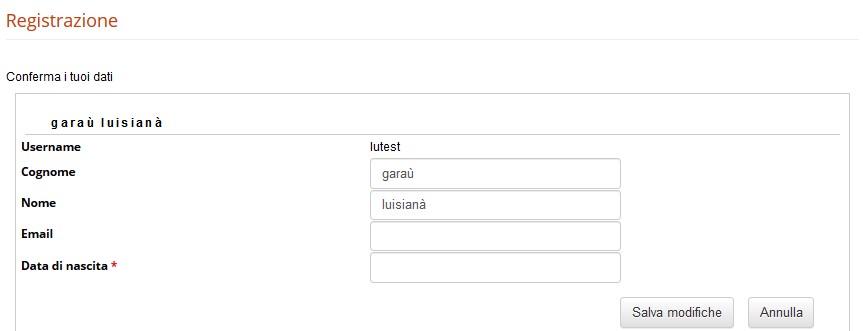
eventi 9

At that point, simply confirm your data and click on the "Save changes" button

eventi 10


The user is thus registered for the event. If you wish to unsubscribe, simply click on the "Unsubscribe" button

eventi 11


The user of the Administrator, Teacher level or in any case with modification permissions has a number of more possibilities.

Front End event booking management


The administrator, once entered the course and clicked on the booking / registration management form, will see the following screen

event2

By clicking on "Show registered users", you can view the names of registered users of the event
By clicking on the "Assign users" button, you can force the reservation of the event to users selected from among those
By clicking on "Send mail" you can send an email to users registered for the event
By clicking on "Edit" you can edit the event
By clicking on "Cancel" you can delete the event
By clicking on "Who can register for the event" you can change the viewing permissions of the event

What are the Catalogs for?

The catalog is usually used if you want to allow users to self-register for courses. In some cases - since the courses can be divided into "categories" - it is also useful to show the courses divided into categories. This is especially useful if there are many courses.

Otherwise, it may be better to leave the "catalog" tab disabled and keep only the "elearning" button, which shows the courses to which a user is already enrolled.

The possible uses of the "catalog" function are:

  • in general, distinguish between the courses that you want to appear in the "catalog" tab and those that should not appear
  • in more detail, it serves to show different catalogs to different users: for example, to show specific topics to specific organization chart nodes or specific roles. Or to specific customers.

In this way we will be able to allow each type of user to see the most suitable courses and to register independently. Let's take as an example, a company that wants to offer employees in the Sales Area, a catalog that includes a list of courses from which the user can choose which one to enroll in.
Below is the simple procedure for creating and configuring the catalog.

Create a Catalog

Go to Administration / E-learning / Courses / Course Catalog 

catalogue 1


To create a catalog, click on the "New catalog" button 

catalogue 2


Enter the name of the catalog and click on the "Save changes" button. Following our example, we will call the catalog "Sales Office". 

catalogo 1


Configure the Catalog

For the configuration of the catalog we just created, we have several available buttons / icons . Each of these allows for a different configuration. Let's see them in detail.

catalogue 4


By clicking on the first "Show catalog items" icon, you can choose and insert courses within the Catalog. Just put the check on the courses you want to insert. Following our example, we will insert "Course for Sales Area" and "Course for Advanced Sales Area" 

catalogue 5


By clicking on the second "Assign Users" icon, the users that you can assign to this catalog can be chosen as follows: 

  • users belonging to one or more specific groups
  • users belonging to one or more nodes of the organization chart
  • users who play a role that we want to be able to view the Catalog.

According to our example, we choose that all users entered in the "Sales Area" node of the organization chart view the Catalog and the courses it contains. Then put the check on "Yes" and then click on "Save Changes" 

catalogue 6


By clicking on the third "Register" icon, you can choose the individual users who are supposed to view the Catalog or the users belonging to one or more specific groups or the users entered at one or more nodes of the organization chart or the users who hold a role 

catalogue 7


By clicking on the fourth and fifth "Edit" and "Delete" icons, you can change the title of the catalog and delete it respectively.


View the Catalog in the menu

Forma Lms gives the opportunity to choose whether or not to display the "Catalog" label in the student menu or to show it only to certain students and not to others. Following our example, we only want users belonging to the "Sales Area" node to see the Catalog label once they have entered the platform. How to do?

Go to Administration / Configuration / E-learning configuration / User area in the LMS 

catalogue 8


On the page where all the labels are displayed, click on the "Users" icon relating to the "Course catalog" label 

catalogue 9


At that point you have the possibility to choose which users to display the "Catalog" label, which groups, which nodes of the organization chart, the users who hold a certain role. Following our example, we choose that the Course Catalog label "is displayed by users belonging to the" Sales Area "node 

catalogue 10


At this point, all users belonging to the "Sales Area" node of the organization chart, once they have entered the platform, view the Course Catalog item 

catalogue 11


Today we will focus on the step-by-step description of the manual "user creation" procedure. In fact, it is also possible to import users via csv files, for massive subscriptions. Let's take as an example the creation of the user 'Mario Rossi' in the organization chart "Milan District " which is in the following position of the organization chart: North / West HQ-> Area Manager Lombardy -> Milan District 

First phase: Identification of the node in which to insert the user

Go to Administration / Users/ Users Management

utenti1


We select the node in which to insert the user in the organization chart tree 

anag first


To create our first user, simply click on the "New user" button, after which a screen will open for entering user data. It is possible to associate the level of permissions to be associated with the user.

anag first 3


Those shown in the above image are the standard fields that the platform makes available. It is possible to create custom fields that, suitably associated, would be shown in this user entry screen.

The fields provided by FormaLMS are:

  • Username (which also represents the login to access the platform) - must be unique
  • First name
  • Last name
  • E-mail
  • Password (it is possible to define the policies that can be used by configuring the platform)
  • Repeat the password
  • Level (user, administrator, public administrator, super administrator)
  • Language

At this point it is possible to enter the user data by filling in the required fields, then click on the "Confirm" button. Using the "Organization chart" tab it is possible to modify the organization chart of the user being created.

anag first 4


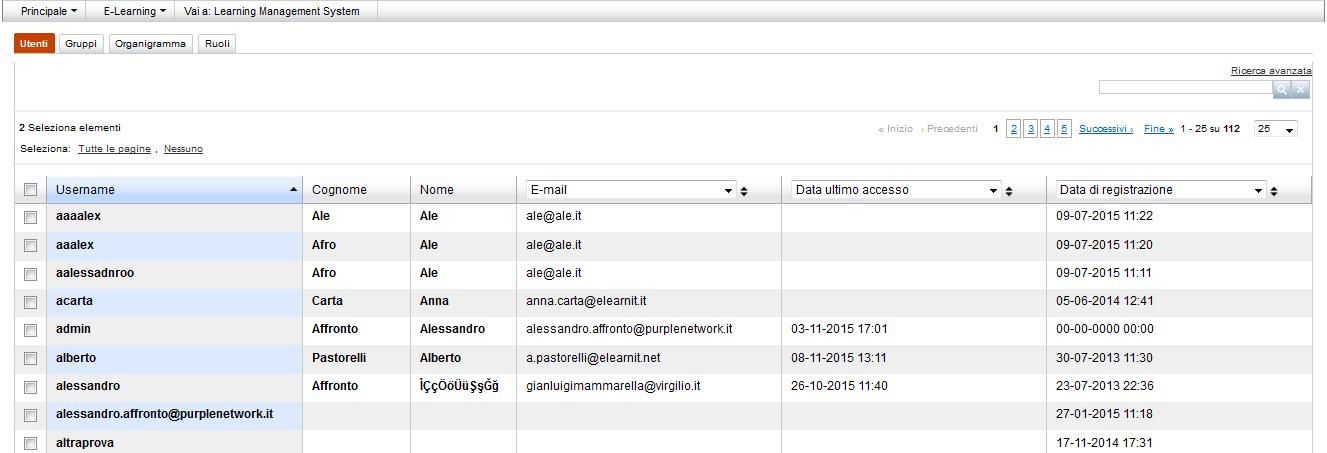
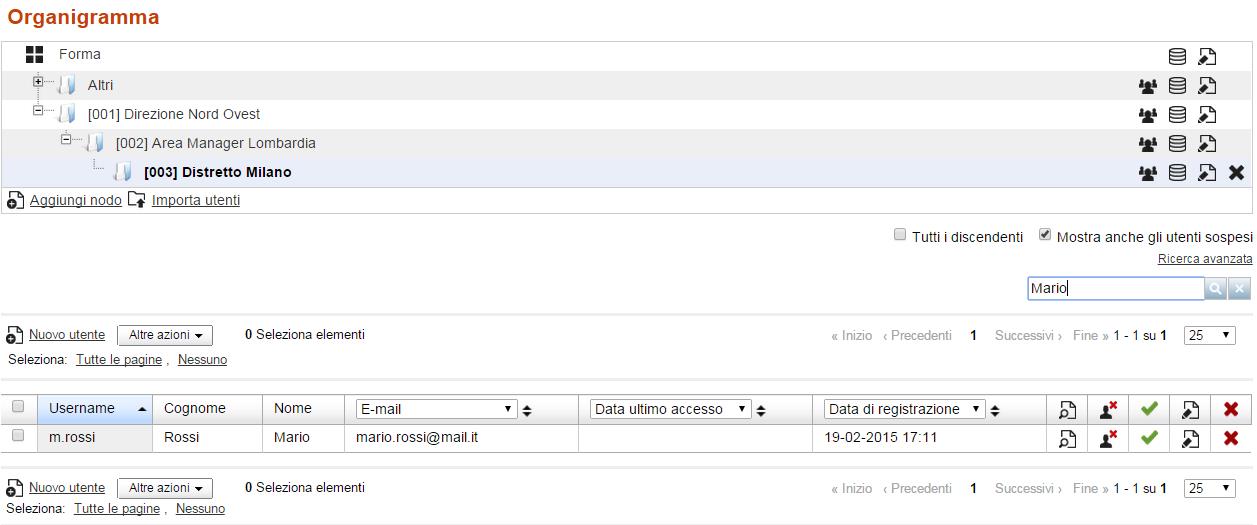
At this point it will be possible to trace the user within the organization chart node in which we created him or by searching among all users (Img. 5). By entering the name, surname or username it is possible to search for the user through the standard search as shown in the image below.

anag first 5


If you want to search for the user for a specific field, you can use the advanced search. Just click on the Advanced Search link (Image below, highlighted in red).

In this example we are looking for all users who have a registration date after 01/02/2015 

6 conf


It is possible to modify the user created at any time using the edit button or delete the user. 

anag first 7


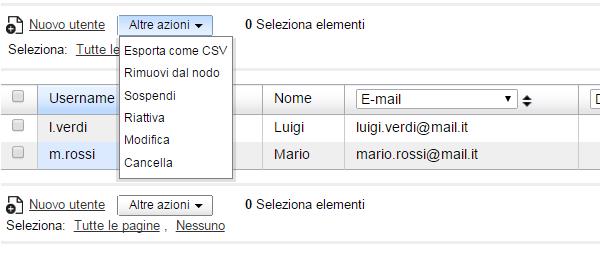
Massive user functionality can be very useful. In fact, by making a selection of the users on which you want to operate, here are the actions that can be performed on them: 

anag first 8


  • Export users to csv files
  • Remove them from the node they belong to
  • suspend them
  • reactivate
  • change them
  • delete them

The difference between suspension and cancellation is of fundamental importance. In fact, by deleting a user, its usage data will also be removed, while by suspending it, the user will not be able to access the platform but for the administrators it will be possible to view its teaching activity. This functionality is of fundamental importance where users cease to be part of our user population, but it is necessary to produce evidence of the training provided.

The tutorial on how to manage the users list is divided in two parts: 

  • The first part is to create the hierarchical structure of your organization (optional).
  • The second part consists of creating and inserting user data.


In this article we will describe step by step the procedure of creating the hierarchical structure of the organization chart and subsequently we will analyze the user creation procedure.

Let's take as an example the creation of a hierarchical structure of 3 levels by mapping it for simplicity with geographical parts of Italy: North / West Headquarters-> Area Manager Lombardia -> Milan District 

Go to Administration / Users/ Users Management

utenti1


At the top of the page, insert the first node under the folder root "Forma" in the "Organization chart" section. Please note that you can rename that folder as you wish. 

utenti2


To create our first node, just click on the "Add node" button, after which a screen will open for entering the organization chart code and organization chart name for each of the languages ​​used on the platform. It is possible to associate a different graphic template to each node of the organization chart, after creating customized templates.

anag sec 3


The organizational chart code as well as descriptive functions of the structure has an important role in a possible process of automatic subscription to the platform by users, which we will see in a dedicated tutorial. It can also be used as a unique identificator in case you want to synch your LMS with your HR Management System or any third-party system. 

At this point it is possible to insert another node at the same level as the previous one (eg "North East HQ"), or to create a sub node, as we will do in our example.

To do this it is necessary to click on the newly created node and click on the "Add Node" button, the procedure is exactly the same as the one previously carried out and will be repeated cyclically to create further sub-nodes

utenti3


At this point it will be possible to create or import users within the nodes that we have created and through user profiling create hierarchical relationships between users that have effects on the use of the platform, from enrollment to courses to the possibility of filtering reports .

The creation of a hierarchical structure such as the organization chart therefore has a strong impact on the whole use of FormaLMS.

It is possible to associate already existing users to a new mode using the highlighted button

anag sec 5


It is also possible to associate user custom fields and define whether these fields should be used for users belonging to a node, whether they are mandatory or not, whether they are visible to users or not, using the highlighted button

anag sec 6


Finally, it is possible to modify the node created at any time using the modify button or to delete the node only if this is an empty node. The button is made available only for the nodes that satisfy this requirement. 

anag sec 7


During the delivery of a course, it is often essential to know the progress of the user in order to know, for example, if it is appropriate to organize a reminder mailing for those who have not yet completed the course (it can be done from the same Forma Lms platform itself ) or simply to know exactly the number of participants who have not started, who are in progress or who have completed. In Forma Lms it is possible to become aware of this thanks to the reports. Reports can be displayed online or downloaded in .csv or .xls. 

Each report can be created by entering the data of interest according to your needs. In this first part we will see how to create a report of a course of which we want to know the details of each participant. In the tutorial "How to create a course report (Second part)" we will describe how to create a summary report of one or more courses.

For example, let's imagine that we need to know who the students enrolled in the Excel course are, the date of enrollment and the state of the users. Let's see how.

Creation of a course report (with details of the data of each individual participant)

Go to Administration / Elearning / Report 
To create a new report, click on the "New" button

 report1


Enter the course title and select the type of report you want to create. If you want to have the details of each participant, choose "Users". If you want a summary report of a course instead, you must choose "Courses", a typology that we will see later. 

report2


Select the users whose data you want to view in the report. If you want to report all the participants of the course, select "Report for all users".

report3


At this point you have to choose the type of relationship between the data you want to view. Usually "Relate users to courses" is used. 

report4


We first select the course we want to report on. Following our example, we will put the check on "Manual course selection" and consequently on the "Excel" course

After that we will put the checks in the filters that we want to be present in the reports. 

report 5


Once the filters have been selected, you can choose among these options: display without saving; save and go back to the list; save and display; cancel

rep first 6


Export the report

Once the report is created, we can export the file to .csv or .xls.

report7


Sending mail

It is also possible to send an email, for example a reminder to those who started using the course but have not finished it. At this point, we will select all the users who report the "In itinere" (in progress) status and click on the "Send email" button 

 report8


We just have to enter the subject of the email and enter the content and then click on "Send email". 

 rep first 9


Now the report and sending the reminder to the learners is complete.

Please refer to the tutorial "How to create a course report (Second part)" to see how to create a summary report of one or more courses.

This site uses cookies.

Some of the cookies we use are essential for parts of the site to operate and have already been set. We also use Google Analytics scripts, which all use cookies.
You may delete or block all cookies from this site in your browser options.