Keep Forma Open,
Make Forma Yours
Play your part in the exciting adventure
of creating Forma 5
Modern and responsive layout and designed for an easy and engaging user experience
Manage multiple clients and brands with custom layouts from a single platform
Easily create advanced custom reports
Add and customize features to make it perfect for your needs
Forma LMS is an open source Learning Management System, built around the specific needs of corporate training. With Forma You can provide internal training to your employees, build an extended enterprise Lms (by providing training to your employees and your partners, dealers and sellers, each one with their specific courses, look and feel) or use Forma as a content hub with which you can sell your off-the -shelf courses to your customers.
The project is carried out by the forma.association, with over 50 members and 4.000 community users, which are constantly adding new features and making the software more complete and secure.
Tutorials, guides and how-tos!
This tutorial is dedicated to a useful feature that allows you to configure the menu within a course. Let's see step by step how to proceed ...
In this tutorial we will see in detail the procedures for:
Go to Administration / Configuration / Elearning Configuration / Manage menu

We display the list of standard menus pre-set on the platform

Each menu can be duplicated or modified by clicking on the following icons:

Click on the second icon to view the list of areas that make up the menu

For each area, we can modify both the title and (more importantly) the modules that compose it. For example, we want to modify the Student Area. How to proceed?
First of all, click on the "Assign Modules" icon for the Student Area

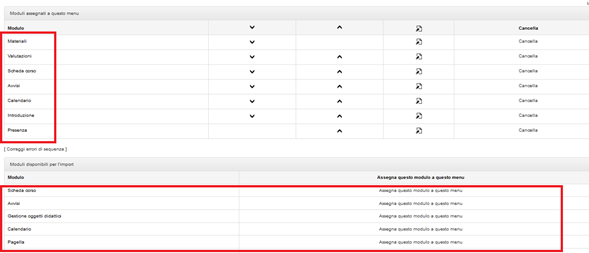
We display the list of modules assigned by default to the Student Area and a series of other modules that can be assigned according to our needs.

For each module we can change the settings (modification, display, creation, etc.) by clicking on the "Change settings" icon.

Let's say, for example, that we want to modify the "Announcements" module.
Click on the relative "Change settings" icon and at that point we will display the settings, in this case of displaying and modifying the module, which we will be able to modify.

The same procedure can be followed to change the settings of all the modules that make up the various menu items.
Remember: once the menu has been modified, it must be assigned to the course (or courses) by going to Administration / Elearning / Courses and clicking on the "Assign a new menu to the course" icon as described in detail in the Tutorial "How to create an elearning course"
For each single course, you can also customize the menu from the front end, let's see how.
Once you have entered the course, we will display the drop-down menu with the different menu items on the left.

To modify any of the menu items, we will have to click on the menu item "TEACHER AREA" and then on the Manage menu module if it's available :-). If not, go back to the previous option :-)

At this point, the module customization procedure is identical to that described in paragraph 1.1.
In this case the changes take effect immediately, there is no need to perform other operations. Important: they only take effect on this specific course.
In addition to the default menus already present on the platform, it is possible to create new menus according to our needs. Let's see how.
In order to create a new menu you will have to follow this simple procedure:
Go to Administration / Elearning / E-learning configuration / Manage menu

Click on the "Add a new custom menu" button

Enter the title of the menu and, if you wish, a brief description. Click on the “Insert” button

Once we have created our new menu, we just have to organize the different areas and assign the modules to each area.
Click on the Edit menu icon ”and then on New

If we want our menu to consist of simply two areas, for example the Student area and the Management area, we will create these two new Areas.
Then insert the title of the menu item, for example Student Area

Once we have created our new Area, let's move on to assigning the modules to it.
Click on the "Assign modules under Student Area" icon and assign the modules according to our needs as described in paragraph 1.1
Remember: once the menu has been created, it must be assigned to the course (or courses) by going to Administration / Elearning / Courses and clicking on the "Assign a new menu to the course" icon as described in detail in the Tutorial "How to create an elearning course"
When it is necessary?
In the event that there is a need to create multiple editions for a single course, for example because a classroom course takes place in different cities and on different dates. How should we proceed?
To access the course management, click on the menu Elearning> Courses> Courses

For "Class" courses, the highlighted column will show the number of editions available for each course:

Click on the number of editions available to view the list (if you need to create the first edition, the number will be 0).

On the course list page, click on the add link and fill in the required information.
In particular, select the date or dates on which the course will be held.

The method of course completion can be defined from the drop-down menu:

So, the course completion occurs when the user performs a test on the platform (which must be a end-of-course marker at the end of the course) or manually when the administrator acknowledges the actual presence in the classroom, see paragraph 4).
Click the "Next" button, and set the start and end times of each classroom day (optional):

In the "Class" column you can set the classroom in which the course will be held.
The classrooms are set up from Elearning> Locations (the location, for example the city) and then adding "classes" (the actual classroom).
To enroll students in a course edition, access the enrollment management page (2):

From this page you can:

At the end of a classroom day, the teacher can access the online attendance register by clicking on the appropriate link (1)

Select the users who were actually present in the classroom on each day.
It is also possible to export the attendance sheet to Excel by clicking on the appropriate button

NB: You can select / deselect all users using the appropriate checkboxes located above each column (select / deselect all users on the same day), and at the end of each row (select / deselect a user on all days of a course)
The "Event Booking" module allows teachers and administrators to create a system of physical events in which users can register through the platform.
To configure an event you need to follow simple steps, let's see them together.
To make the organization of the events on the platform clearer and more orderly, it is best to first divide them into categories. For example, if there are events relating to "Marketing and Communication" it will be appropriate to create the relevant category and then insert the event within it.
Let's first see how to create a new category.
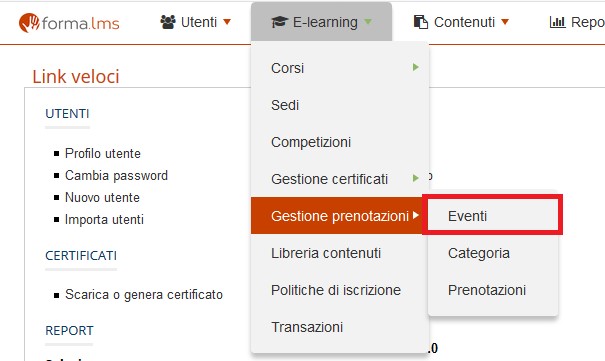
Go to Administration / Booking Management / Category.
Click on the "Add" button and enter the name of the new category and then click on the "New category" button.

At this point we can proceed with the creation of a new event.
Go to Administration / Booking Management / Events

Click on the New event button and enter the data relating to:
• Title
• Description
• the course with which the event is associated
• Category
• Start date
• Date by which registration is possible
• Maximum number of participants
• Schedule

Using the active menu for each event, you can:
• assign users who will be able to register for the event;
• modify the data;
• delete the event.

By clicking on the "Assign users" icon, we can indicate which users can register for that event.
We can select them individually or through the "Groups" or through the "Roles".
In our example, we will insert them individually by putting the check in relation to each user who can register.

To manage the booking of the event go to Administration / Elearning / Booking management / Reservations.

From this page you can create new events or manage the events already created, using the active menu that can be selected next to each event.

By clicking on the various icons in order, you can:
• check the list of members;
• directly enroll users;
• change the details;
• delete the event.
Attention: if the "Reservations" form is not present in the course menu, it will be impossible for users to register for related events.
Now that we have configured our event on the back end side, let's see how a user can book himself for an event on the front end side.
Following our example, the user must enter the "Effective communication" course with which the event is associated.
We have added the "Reservations" form in the "Social Area" menu item.
Of course, like all menu items, it can be assigned to any section of the course menu.

To book the event, the user must simply (obviously the user must have been previously assigned by the administrator to this event as written in the paragraph "How to assign users to an event".

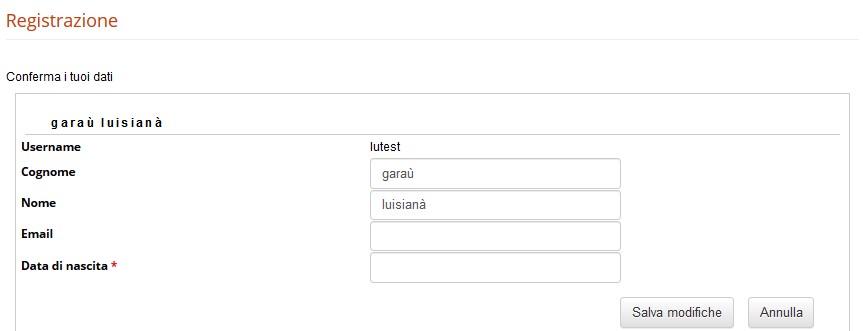
At that point, simply confirm your data and click on the "Save changes" button

The user is thus registered for the event. If you wish to unsubscribe, simply click on the "Unsubscribe" button

The user of the Administrator, Teacher level or in any case with modification permissions has a number of more possibilities.
The administrator, once entered the course and clicked on the booking / registration management form, will see the following screen

By clicking on "Show registered users", you can view the names of registered users of the event
By clicking on the "Assign users" button, you can force the reservation of the event to users selected from among those
By clicking on "Send mail" you can send an email to users registered for the event
By clicking on "Edit" you can edit the event
By clicking on "Cancel" you can delete the event
By clicking on "Who can register for the event" you can change the viewing permissions of the event
The catalog is usually used if you want to allow users to self-register for courses. In some cases - since the courses can be divided into "categories" - it is also useful to show the courses divided into categories. This is especially useful if there are many courses.
Otherwise, it may be better to leave the "catalog" tab disabled and keep only the "elearning" button, which shows the courses to which a user is already enrolled.
The possible uses of the "catalog" function are:
In this way we will be able to allow each type of user to see the most suitable courses and to register independently. Let's take as an example, a company that wants to offer employees in the Sales Area, a catalog that includes a list of courses from which the user can choose which one to enroll in.
Below is the simple procedure for creating and configuring the catalog.
Go to Administration / E-learning / Courses / Course Catalog

To create a catalog, click on the "New catalog" button

Enter the name of the catalog and click on the "Save changes" button. Following our example, we will call the catalog "Sales Office".

For the configuration of the catalog we just created, we have several available buttons / icons . Each of these allows for a different configuration. Let's see them in detail.

By clicking on the first "Show catalog items" icon, you can choose and insert courses within the Catalog. Just put the check on the courses you want to insert. Following our example, we will insert "Course for Sales Area" and "Course for Advanced Sales Area"

By clicking on the second "Assign Users" icon, the users that you can assign to this catalog can be chosen as follows:
According to our example, we choose that all users entered in the "Sales Area" node of the organization chart view the Catalog and the courses it contains. Then put the check on "Yes" and then click on "Save Changes"

By clicking on the third "Register" icon, you can choose the individual users who are supposed to view the Catalog or the users belonging to one or more specific groups or the users entered at one or more nodes of the organization chart or the users who hold a role

By clicking on the fourth and fifth "Edit" and "Delete" icons, you can change the title of the catalog and delete it respectively.
Forma Lms gives the opportunity to choose whether or not to display the "Catalog" label in the student menu or to show it only to certain students and not to others. Following our example, we only want users belonging to the "Sales Area" node to see the Catalog label once they have entered the platform. How to do?
Go to Administration / Configuration / E-learning configuration / User area in the LMS

On the page where all the labels are displayed, click on the "Users" icon relating to the "Course catalog" label

At that point you have the possibility to choose which users to display the "Catalog" label, which groups, which nodes of the organization chart, the users who hold a certain role. Following our example, we choose that the Course Catalog label "is displayed by users belonging to the" Sales Area "node

At this point, all users belonging to the "Sales Area" node of the organization chart, once they have entered the platform, view the Course Catalog item

The Forma Lms project is driven by the community of its adopters, organized in the forma.association
Become a member to support the project and make your opinion count: join the association now!
A learning management system designed to fit the specific needs of your organization: start with all the features of a standard LMS, configure it with hundreds of available options, integrate with your other systems through connectors and APIs, extend with lots of available plugins, or add your custom features.
Forget the limits of saas platform and get free: here EVERYTHING IS POSSIBLE!

Knowledge, through learning, today is probably the most critical asset for any company willing to stay competitive and alive. Modern organizations need adaptive models to face the challenges of their markets: that's why whe choose to be open to evolving diversity since our core code with an open source licencing model, and based the forma.association on the principes of participation, sharing and networking.

Some of the cookies we use are essential for parts of the site to operate and have already been set. We also use Google Analytics scripts, which all use cookies. You may delete or block all cookies from this site in your browser options.